AWS Profile Manager Documentation
Complete guide to installing, configuring, and using AWS Profile Manager — your all-in-one dashboard for managing AWS CLI profiles, terminal, AI commands, and cost analysis.
Installation
System Requirements
| Requirement | Version |
|---|---|
| Python | 3.10+ |
| Node.js | 18+ |
| AWS CLI | v2 (recommended) |
| OS | Windows 10/11, macOS, Linux |
Install from Source
Clone the repository
git clone https://github.com/ynikolarakis/aws-profile-manager.git
cd aws-profile-managerRun setup
This creates a Python virtual environment and installs all dependencies (backend + frontend).
make setupBuild for production
make buildStart the application
Opens the app at http://localhost:8099
make startmake dev instead. This runs the FastAPI backend and Vite dev server concurrently.
Available Commands
| Command | Description |
|---|---|
make dev | Start backend + frontend in development mode (hot reload) |
make start | Production server — backend serves built frontend on port 8099 |
make build | Install dependencies and build both backend + frontend |
make setup | Create virtual environment + install all dependencies |
make test | Run all tests (pytest + vitest) |
make lint | Lint backend (ruff) and frontend (eslint) |
make clean | Remove cache, dist, node_modules, venv |
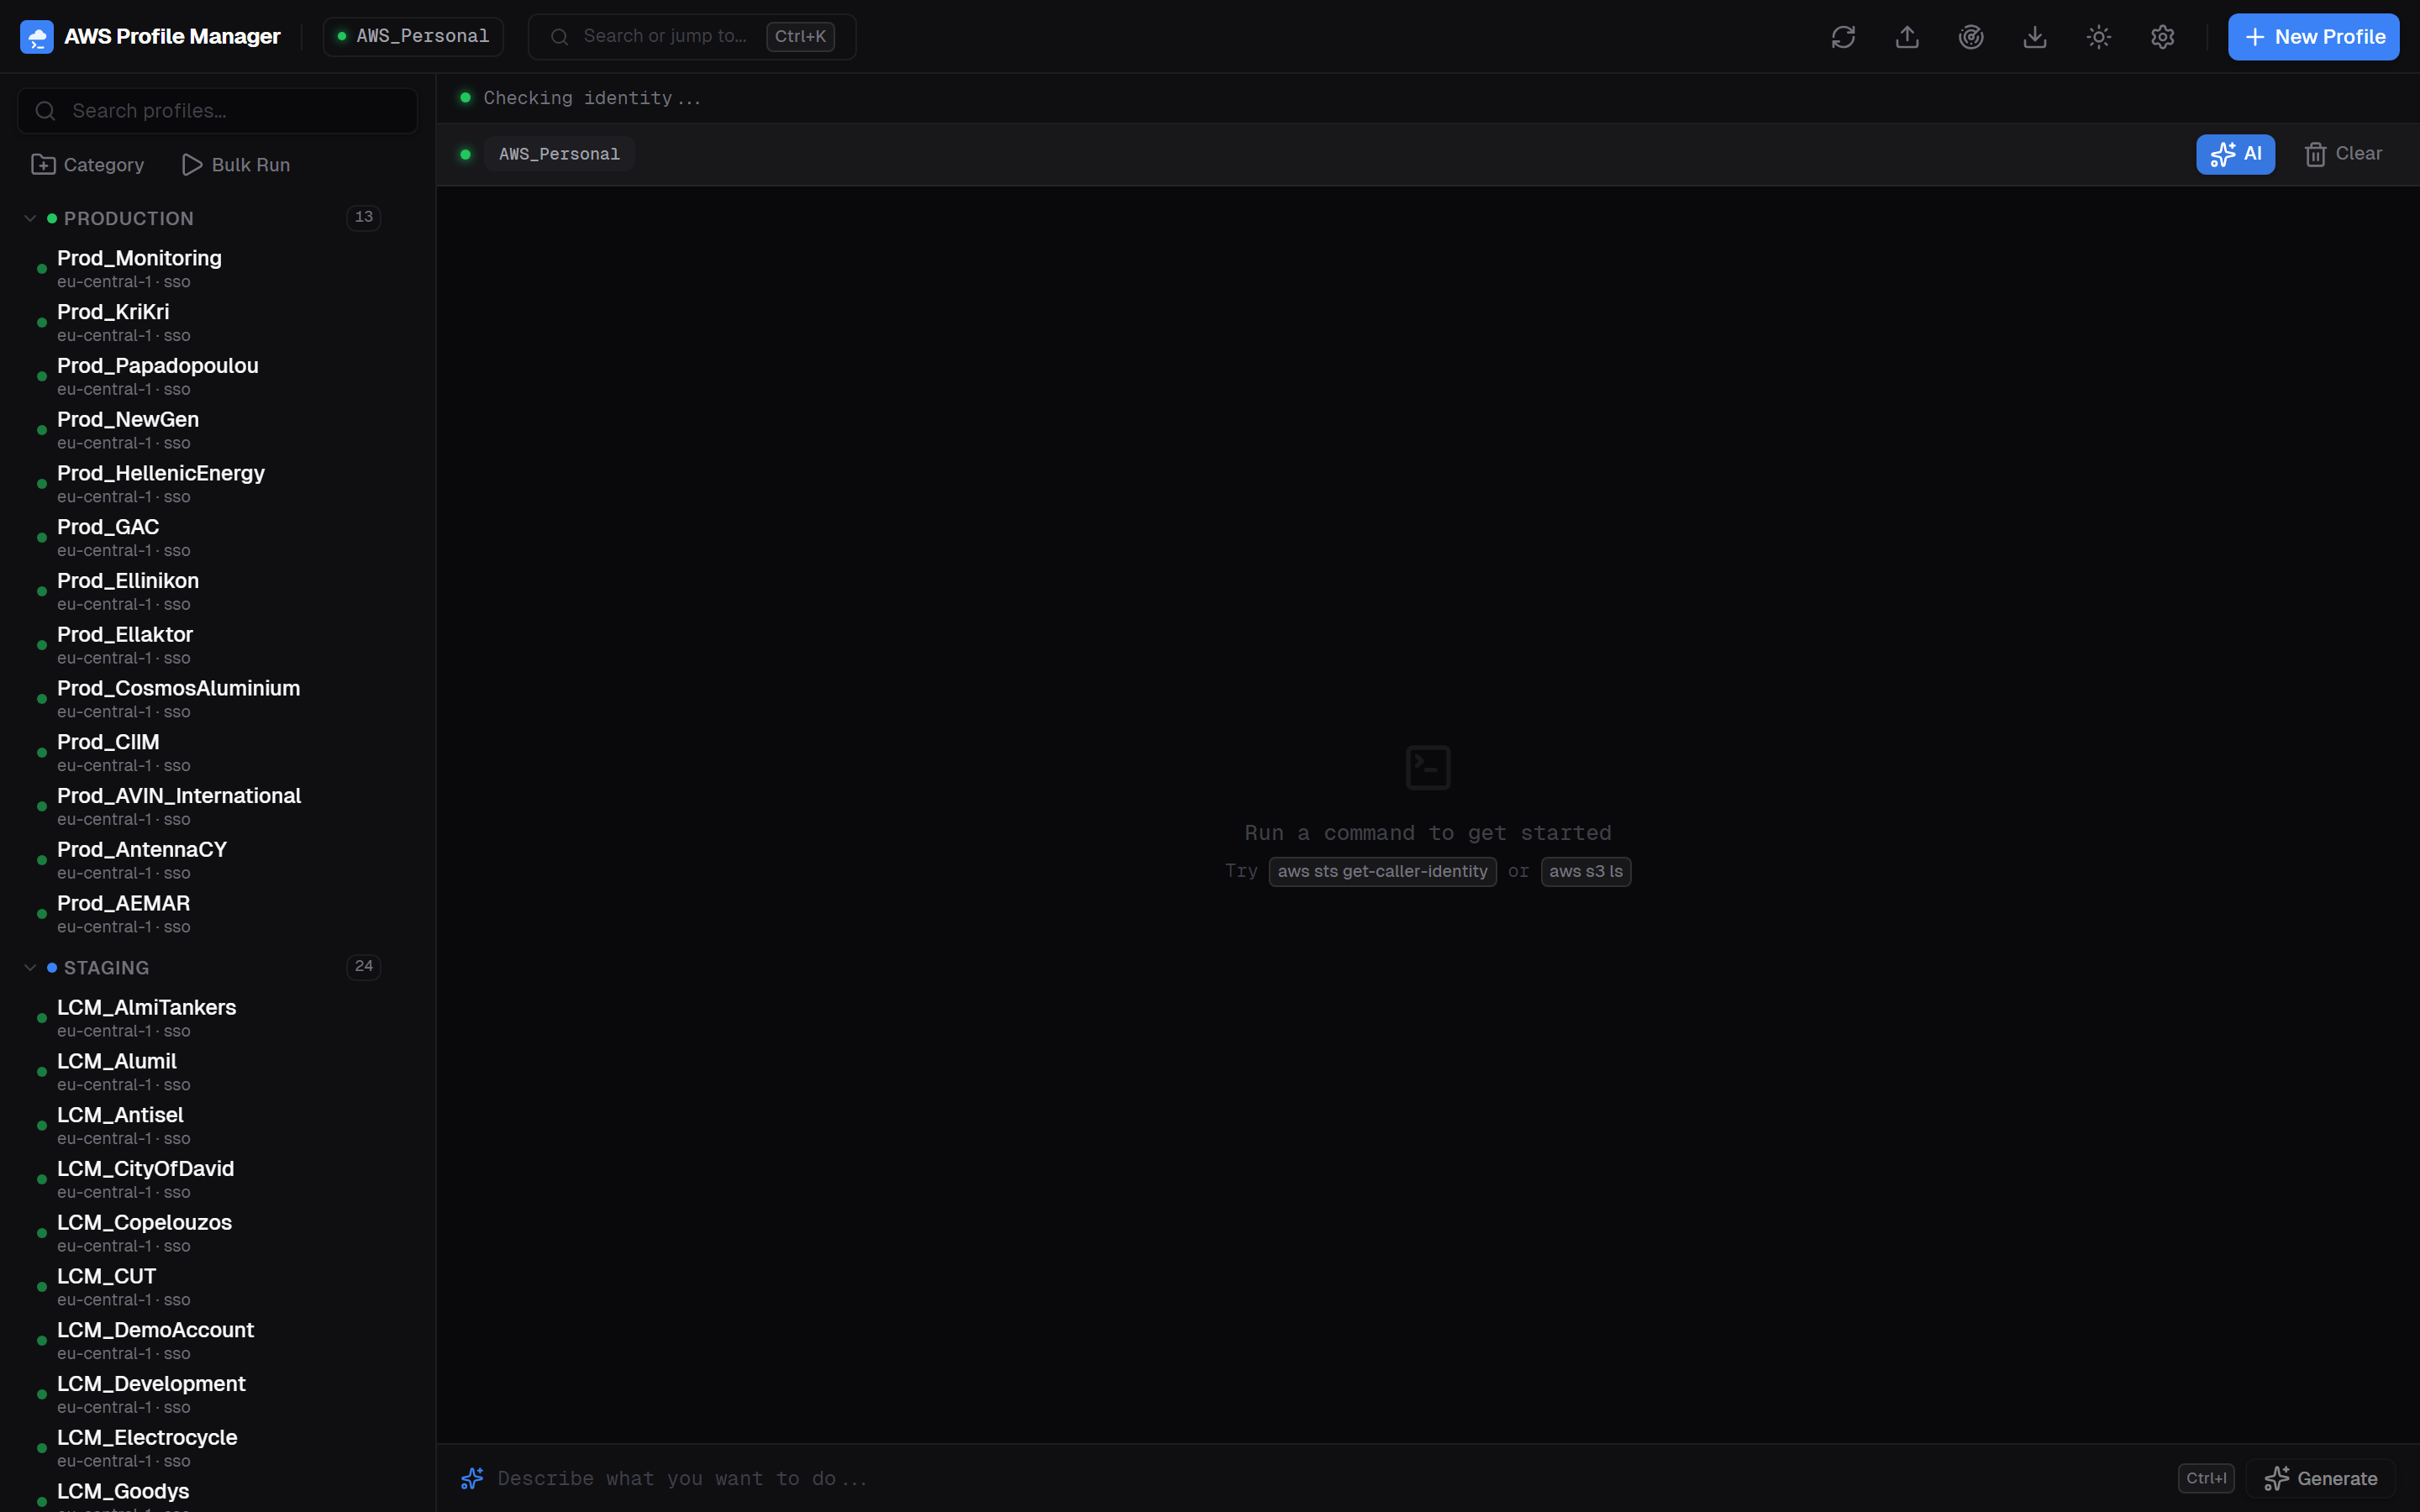
Quick Start
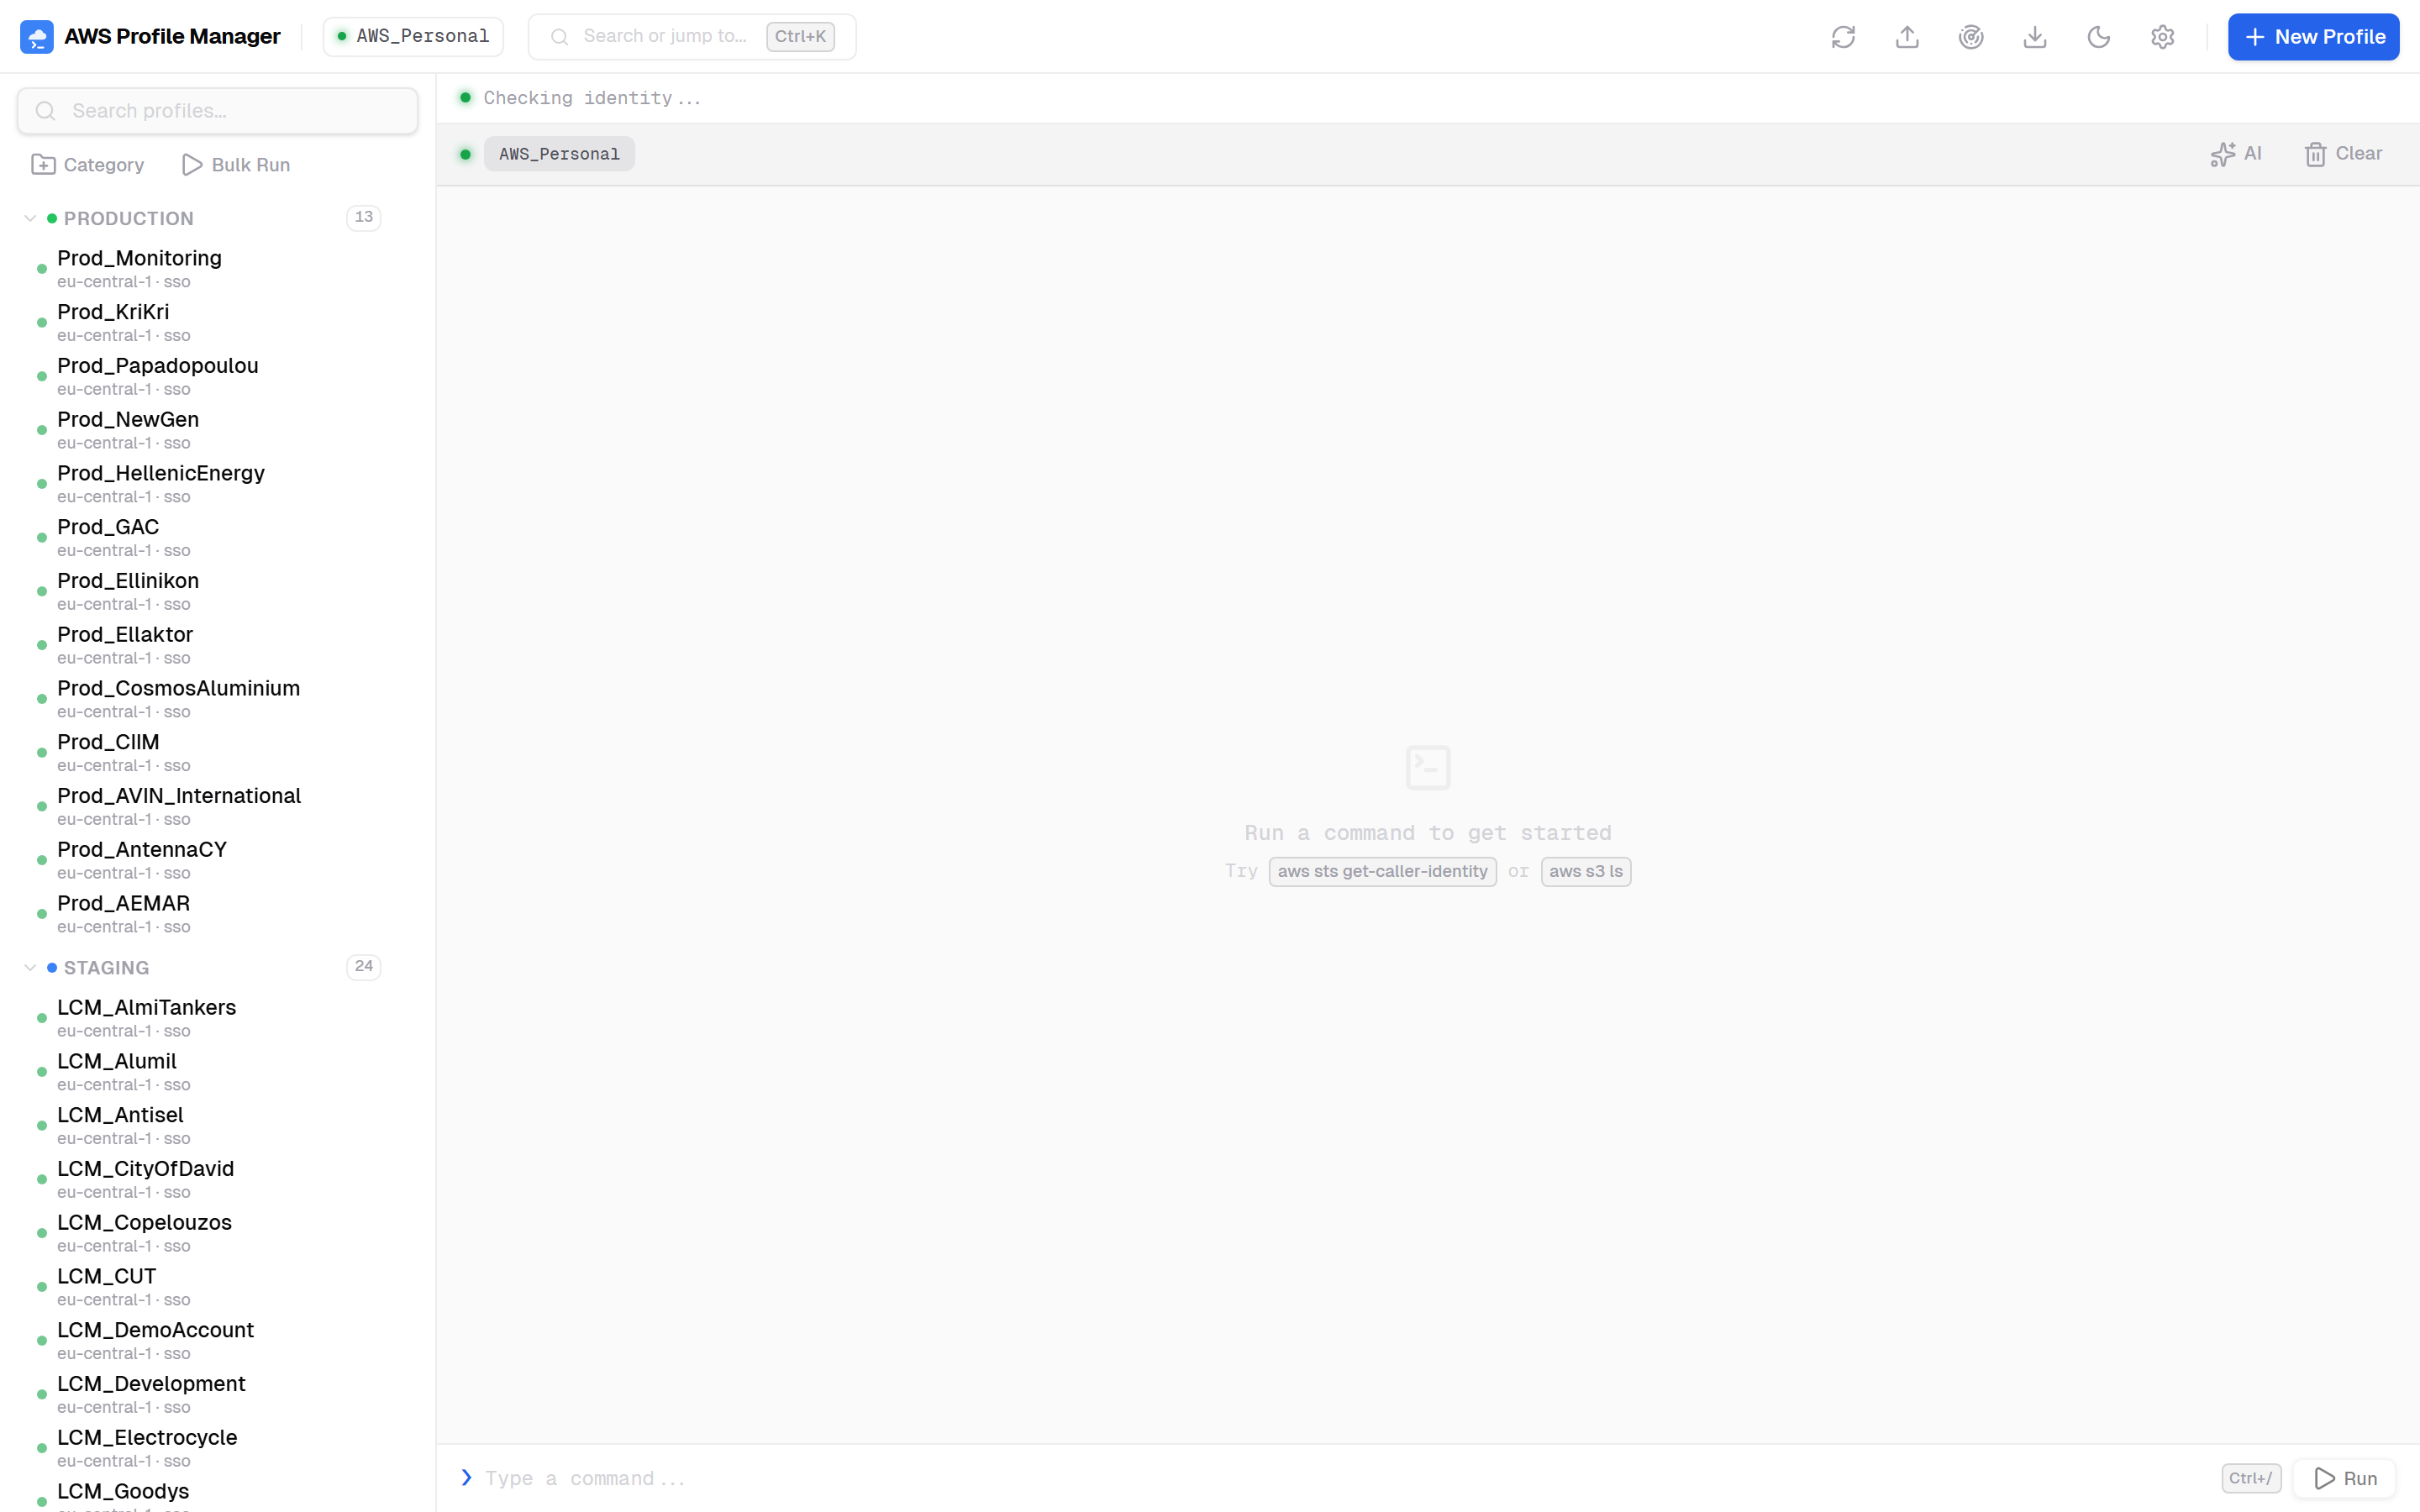
After installation, open http://localhost:8099 in your browser. The app automatically reads your existing AWS profiles from ~/.aws/config and ~/.aws/credentials.
Your profiles appear in the sidebar
All existing AWS CLI profiles are loaded automatically. Click any profile to activate it.
Run your first command
Type aws sts get-caller-identity in the terminal at the bottom and press Enter.
Organize into categories
Click "Category" to create groups (Production, Staging, etc.) and drag profiles into them.
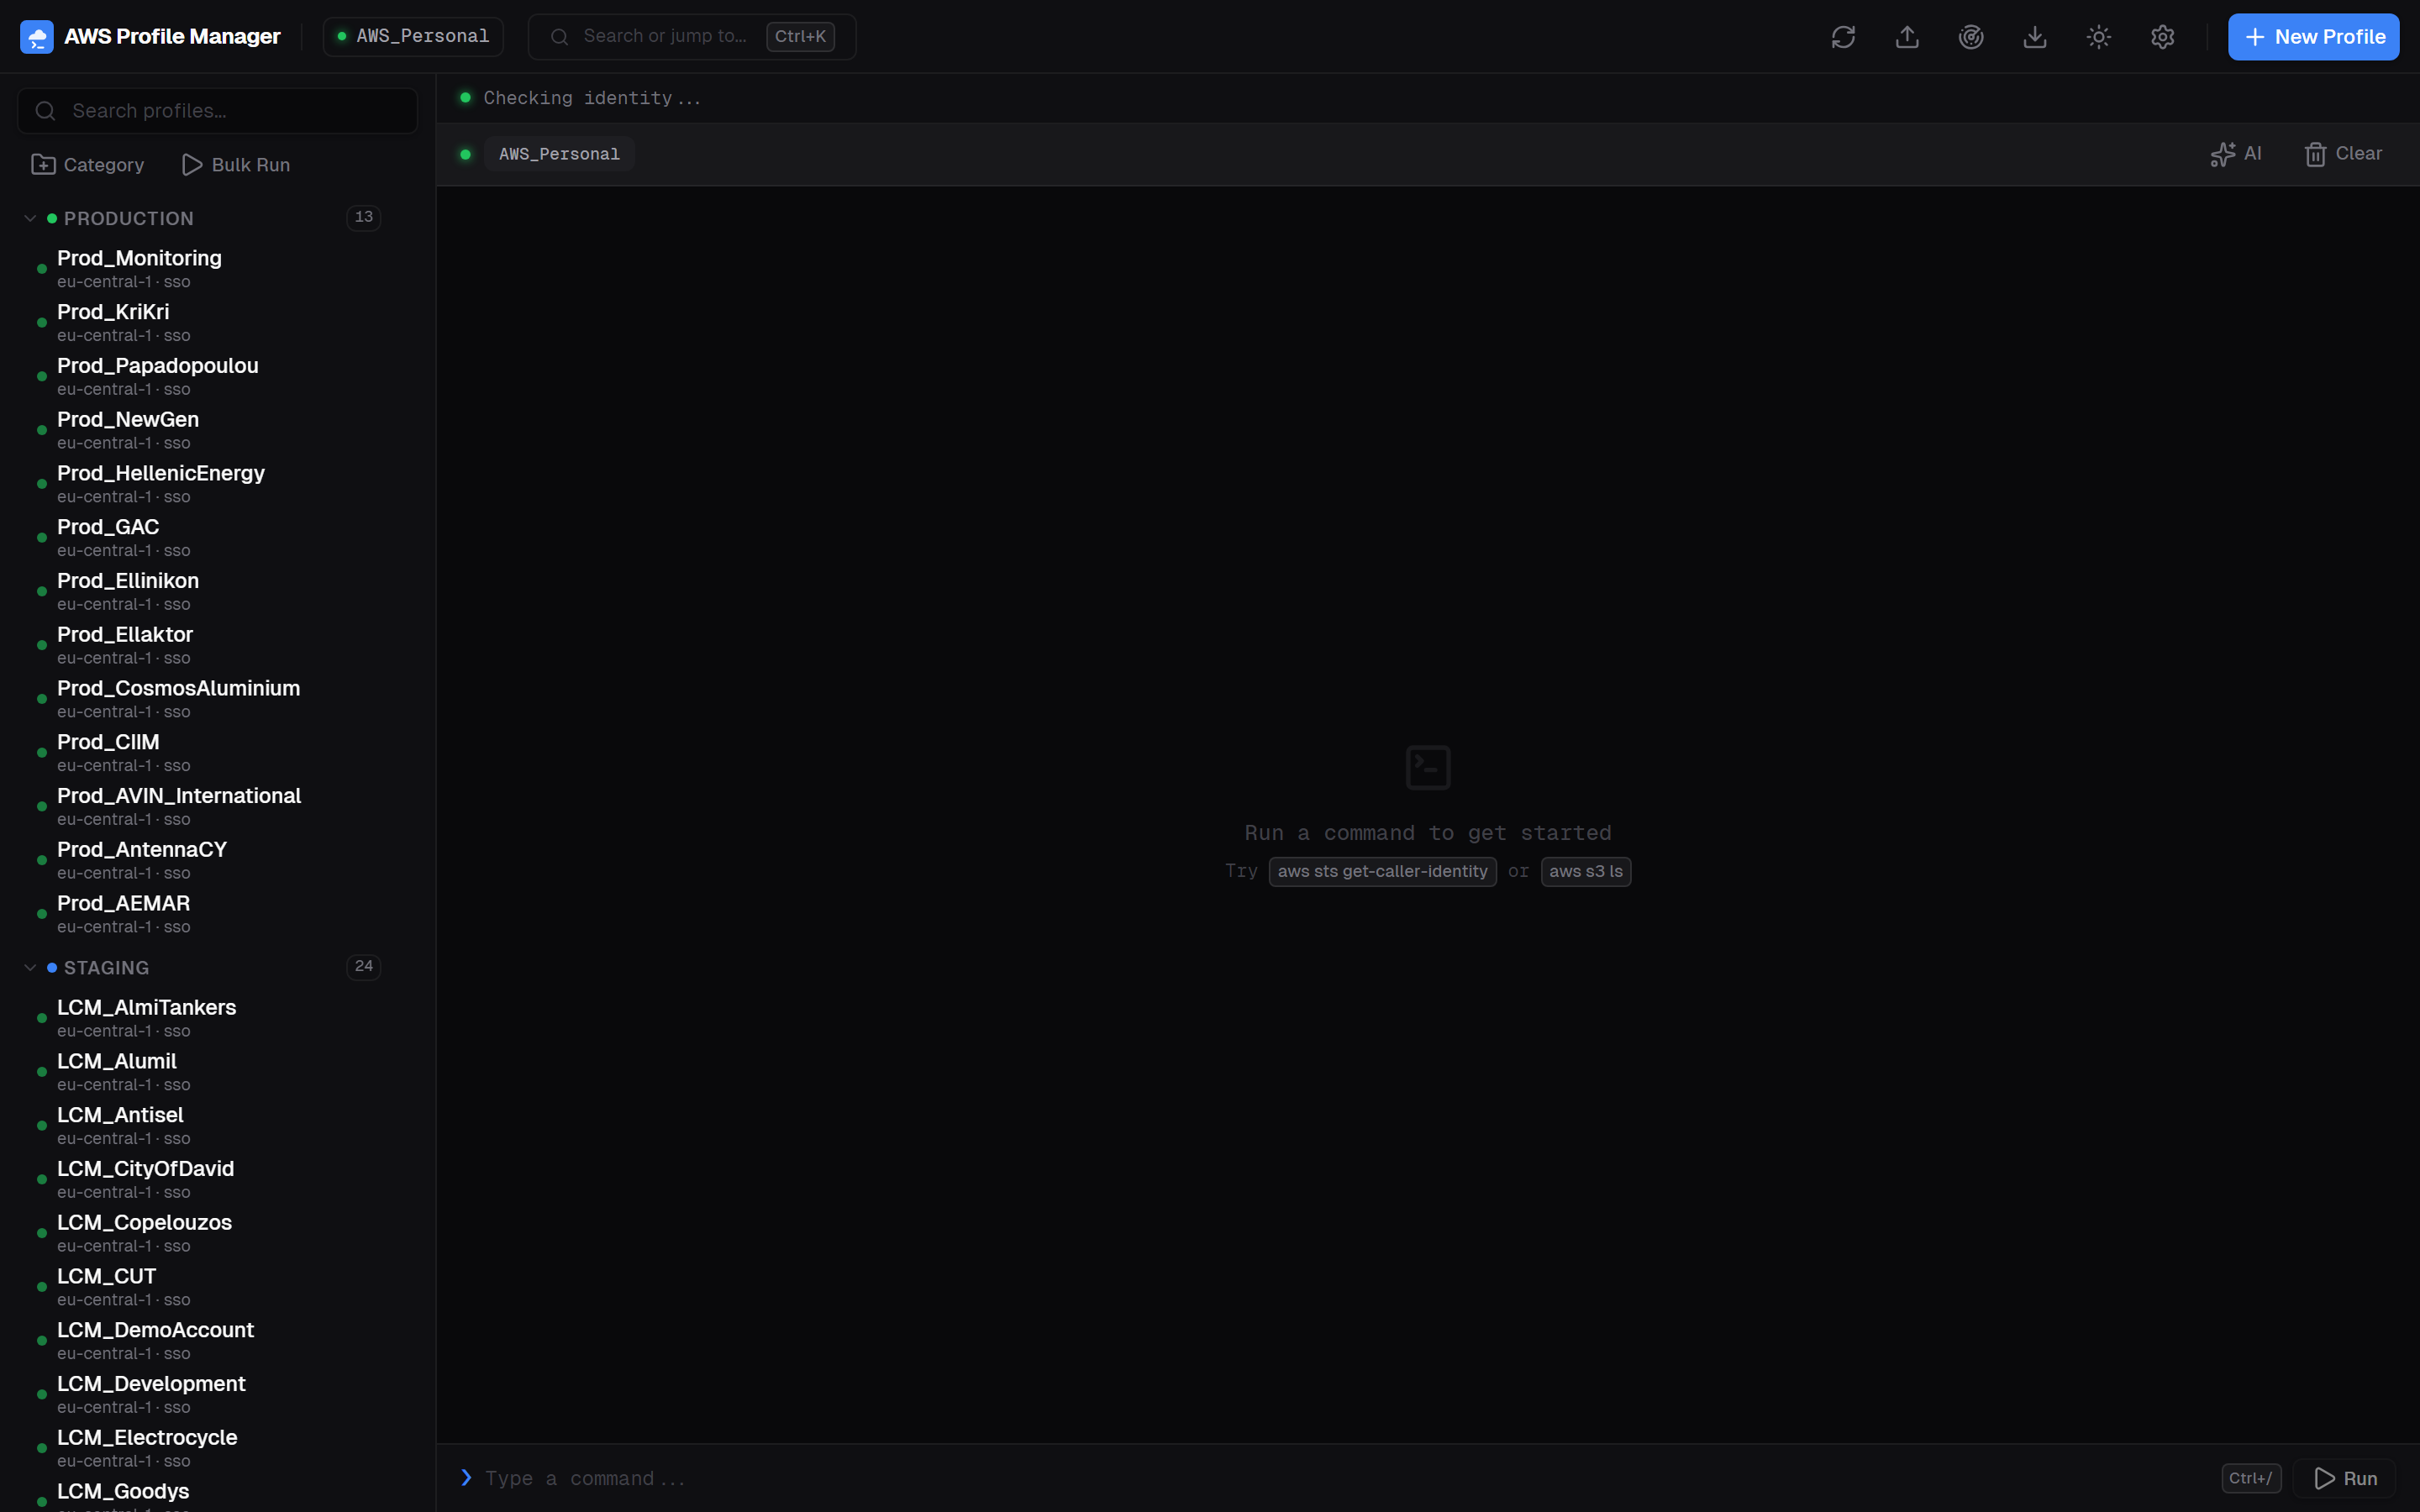
Interface Overview
The interface follows a terminal-first design: the command area takes center stage, while profile management lives in the sidebar.

Header Bar
Active profile name, search (Ctrl+K), favorites, theme toggle, settings, and New Profile button.
Sidebar
Profile search, category groups, profile list with type/region badges, Category and Bulk Run buttons.
Terminal Area
Identity bar showing account ID and ARN. Command output area. Terminal input with AI toggle.
Status Indicators
Green dot = active/authenticated. Orange dot = SSO session expired. Cost badges show 30-day spend.
Profile Types
AWS Profile Manager supports all three AWS CLI profile types:
SSO Profiles SSO
Use AWS IAM Identity Center (formerly AWS SSO) to authenticate. Session tokens are cached in ~/.aws/sso/cache/. The app automatically checks token validity and shows a status indicator.
| Field | Description |
|---|---|
sso_start_url | Your SSO portal URL (e.g., https://myorg.awsapps.com/start) |
sso_region | Region of your SSO instance |
sso_account_id | 12-digit AWS account ID |
sso_role_name | IAM role to assume via SSO |
region | Default region for CLI commands |
Credential Profiles CREDENTIALS
Long-term access keys stored in ~/.aws/credentials. Secret keys are masked in the UI after saving.
| Field | Description |
|---|---|
aws_access_key_id | Your access key ID |
aws_secret_access_key | Your secret access key (masked after save) |
aws_session_token | Optional session token for temporary credentials |
region | Default region for CLI commands |
Role Profiles ROLE
Assume a role from another profile. No credentials stored directly — uses the source profile to get temporary credentials.
| Field | Description |
|---|---|
role_arn | ARN of the role to assume |
source_profile | Name of the profile to assume from |
external_id | Optional external ID for cross-account roles |
region | Default region for CLI commands |
Creating Profiles
Click + New Profile in the header or press Ctrl+N to open the creation dialog.
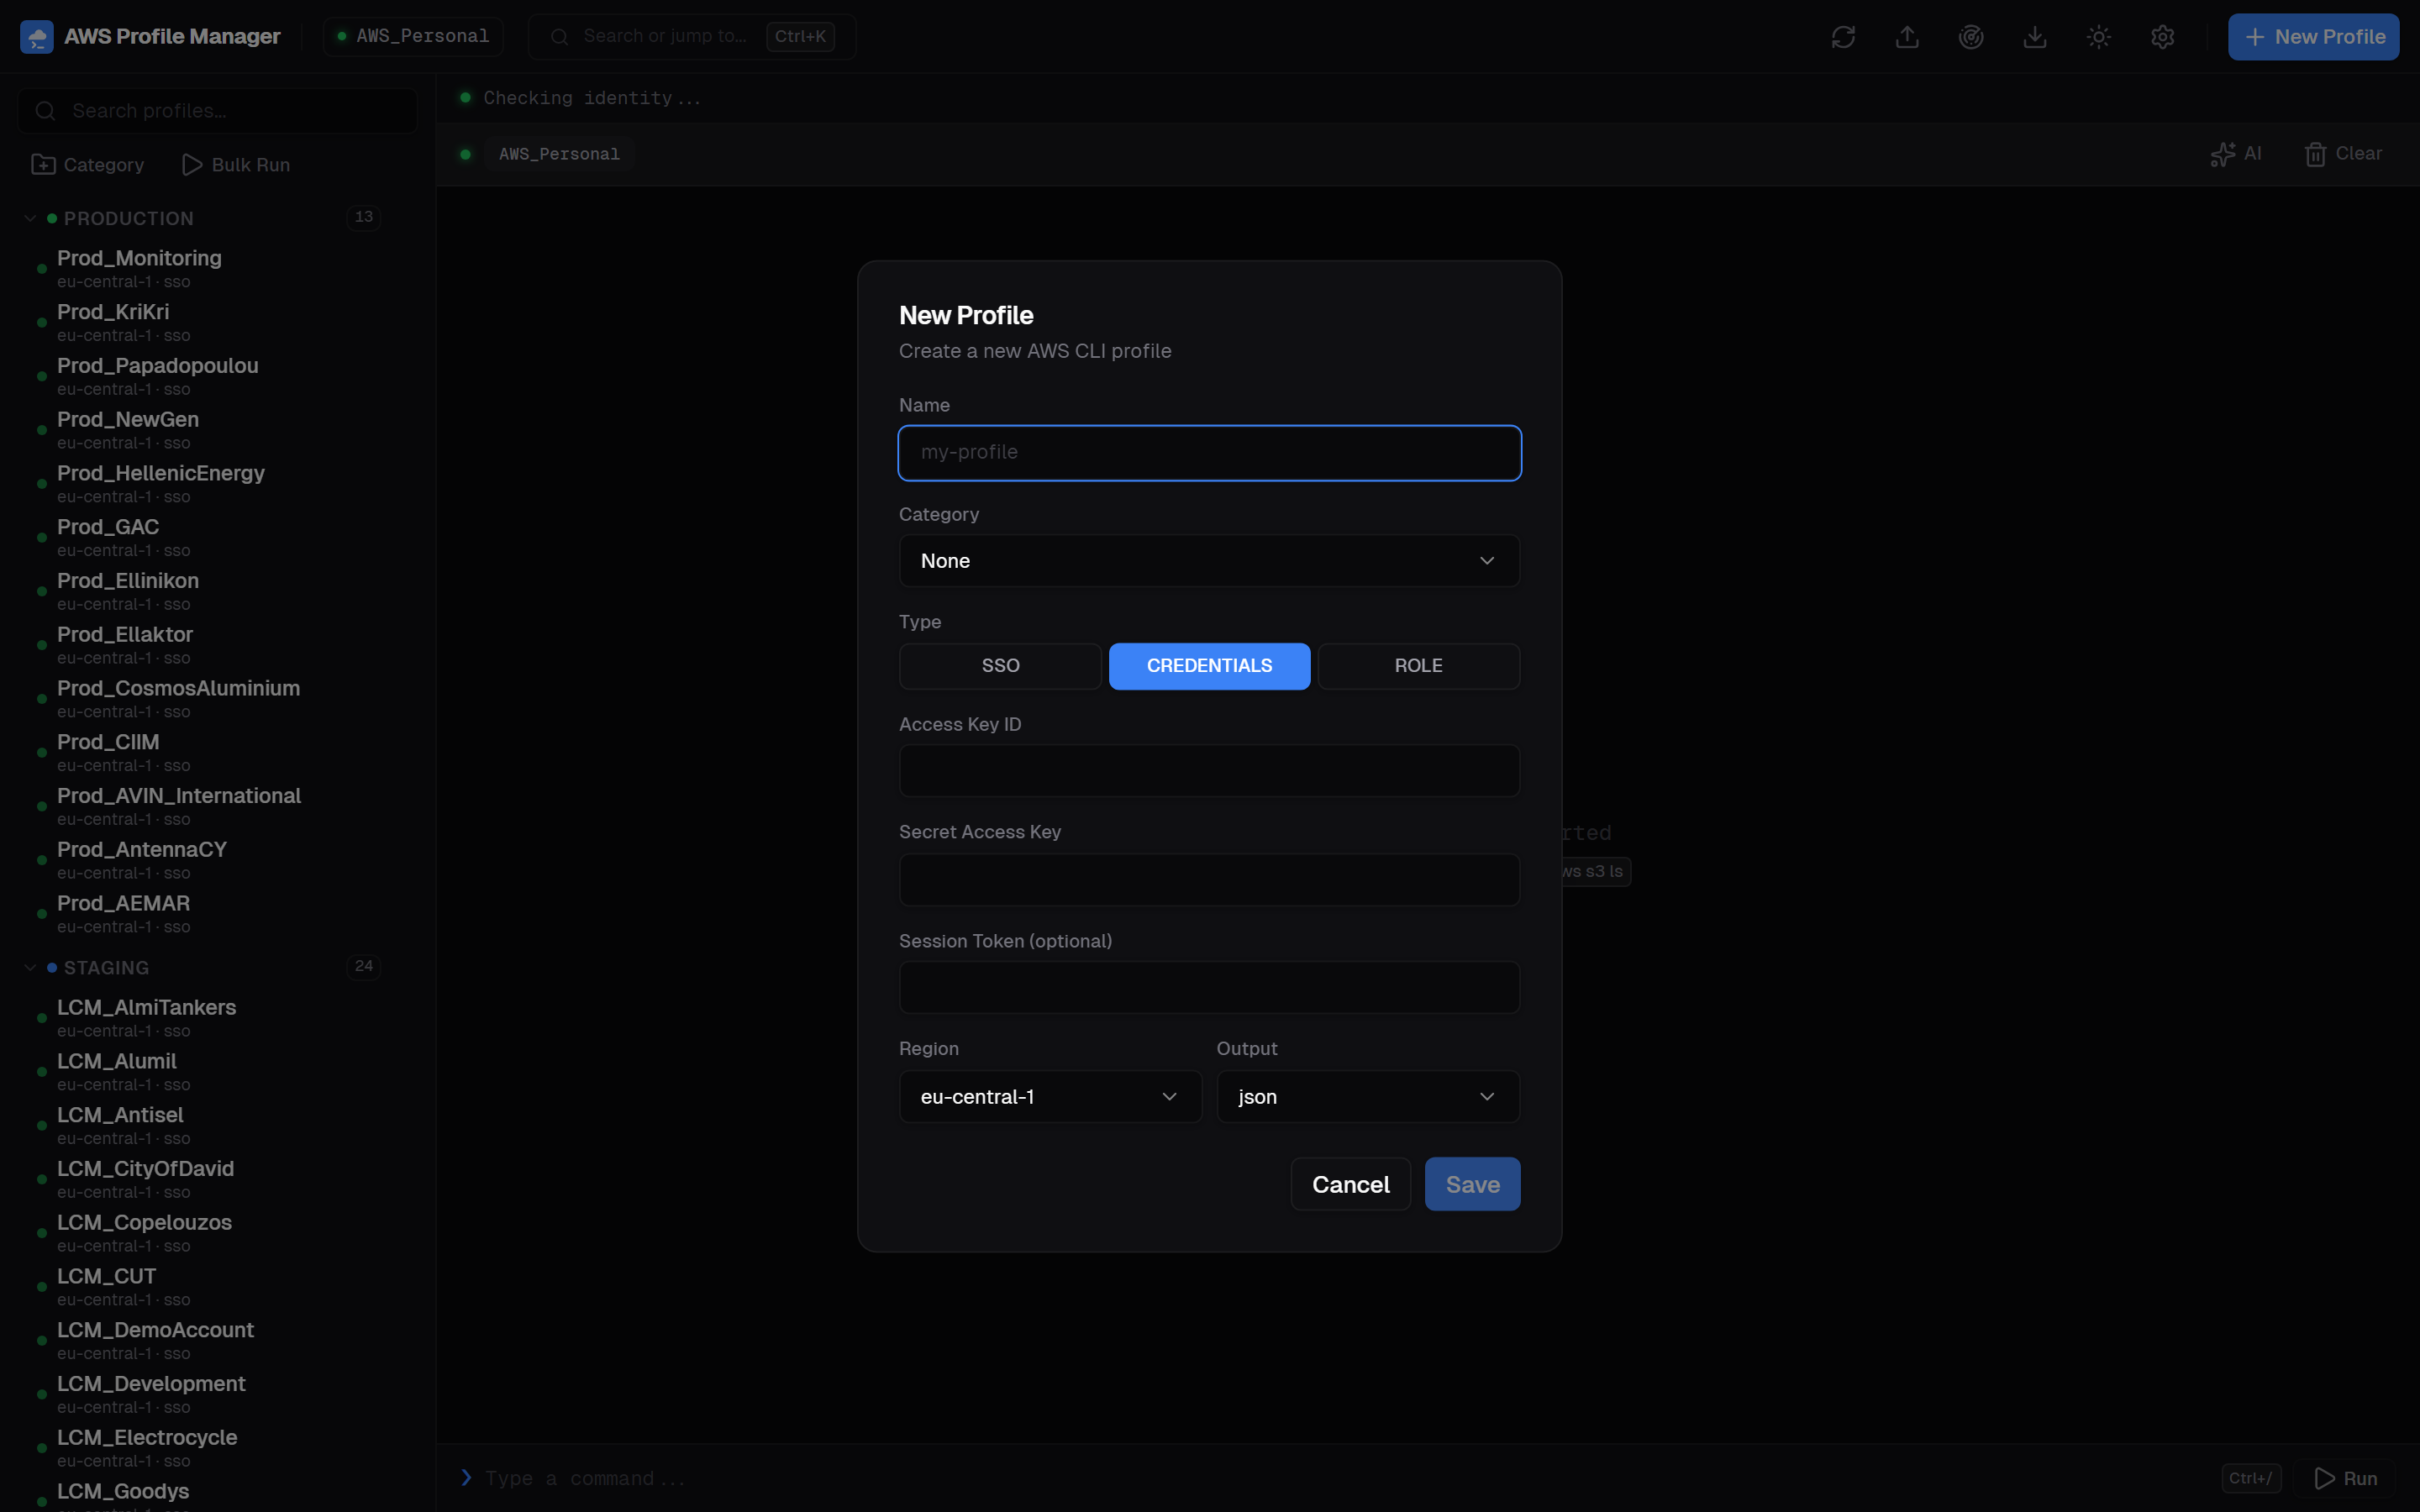
- Enter a profile name (letters, numbers, hyphens, underscores, dots only)
- Optionally assign to a category
- Select the profile type (SSO, Credentials, or Role)
- Fill in the required fields for the selected type
- Choose your default region and output format
- Click Save
Managing Profiles
Click any profile in the sidebar to activate it. The app runs an identity check (STS GetCallerIdentity) and displays the account ID and ARN in the terminal header.
- Activate — Click profile name, use command palette (Ctrl+K), or search
- Edit — Click the three-dot menu on a profile item
- Delete — Available in the context menu or profile editor
- Move to category — Drag or use the context menu to reassign
Categories
Organize profiles into collapsible groups with custom colors. Click Category in the sidebar to create and manage categories.
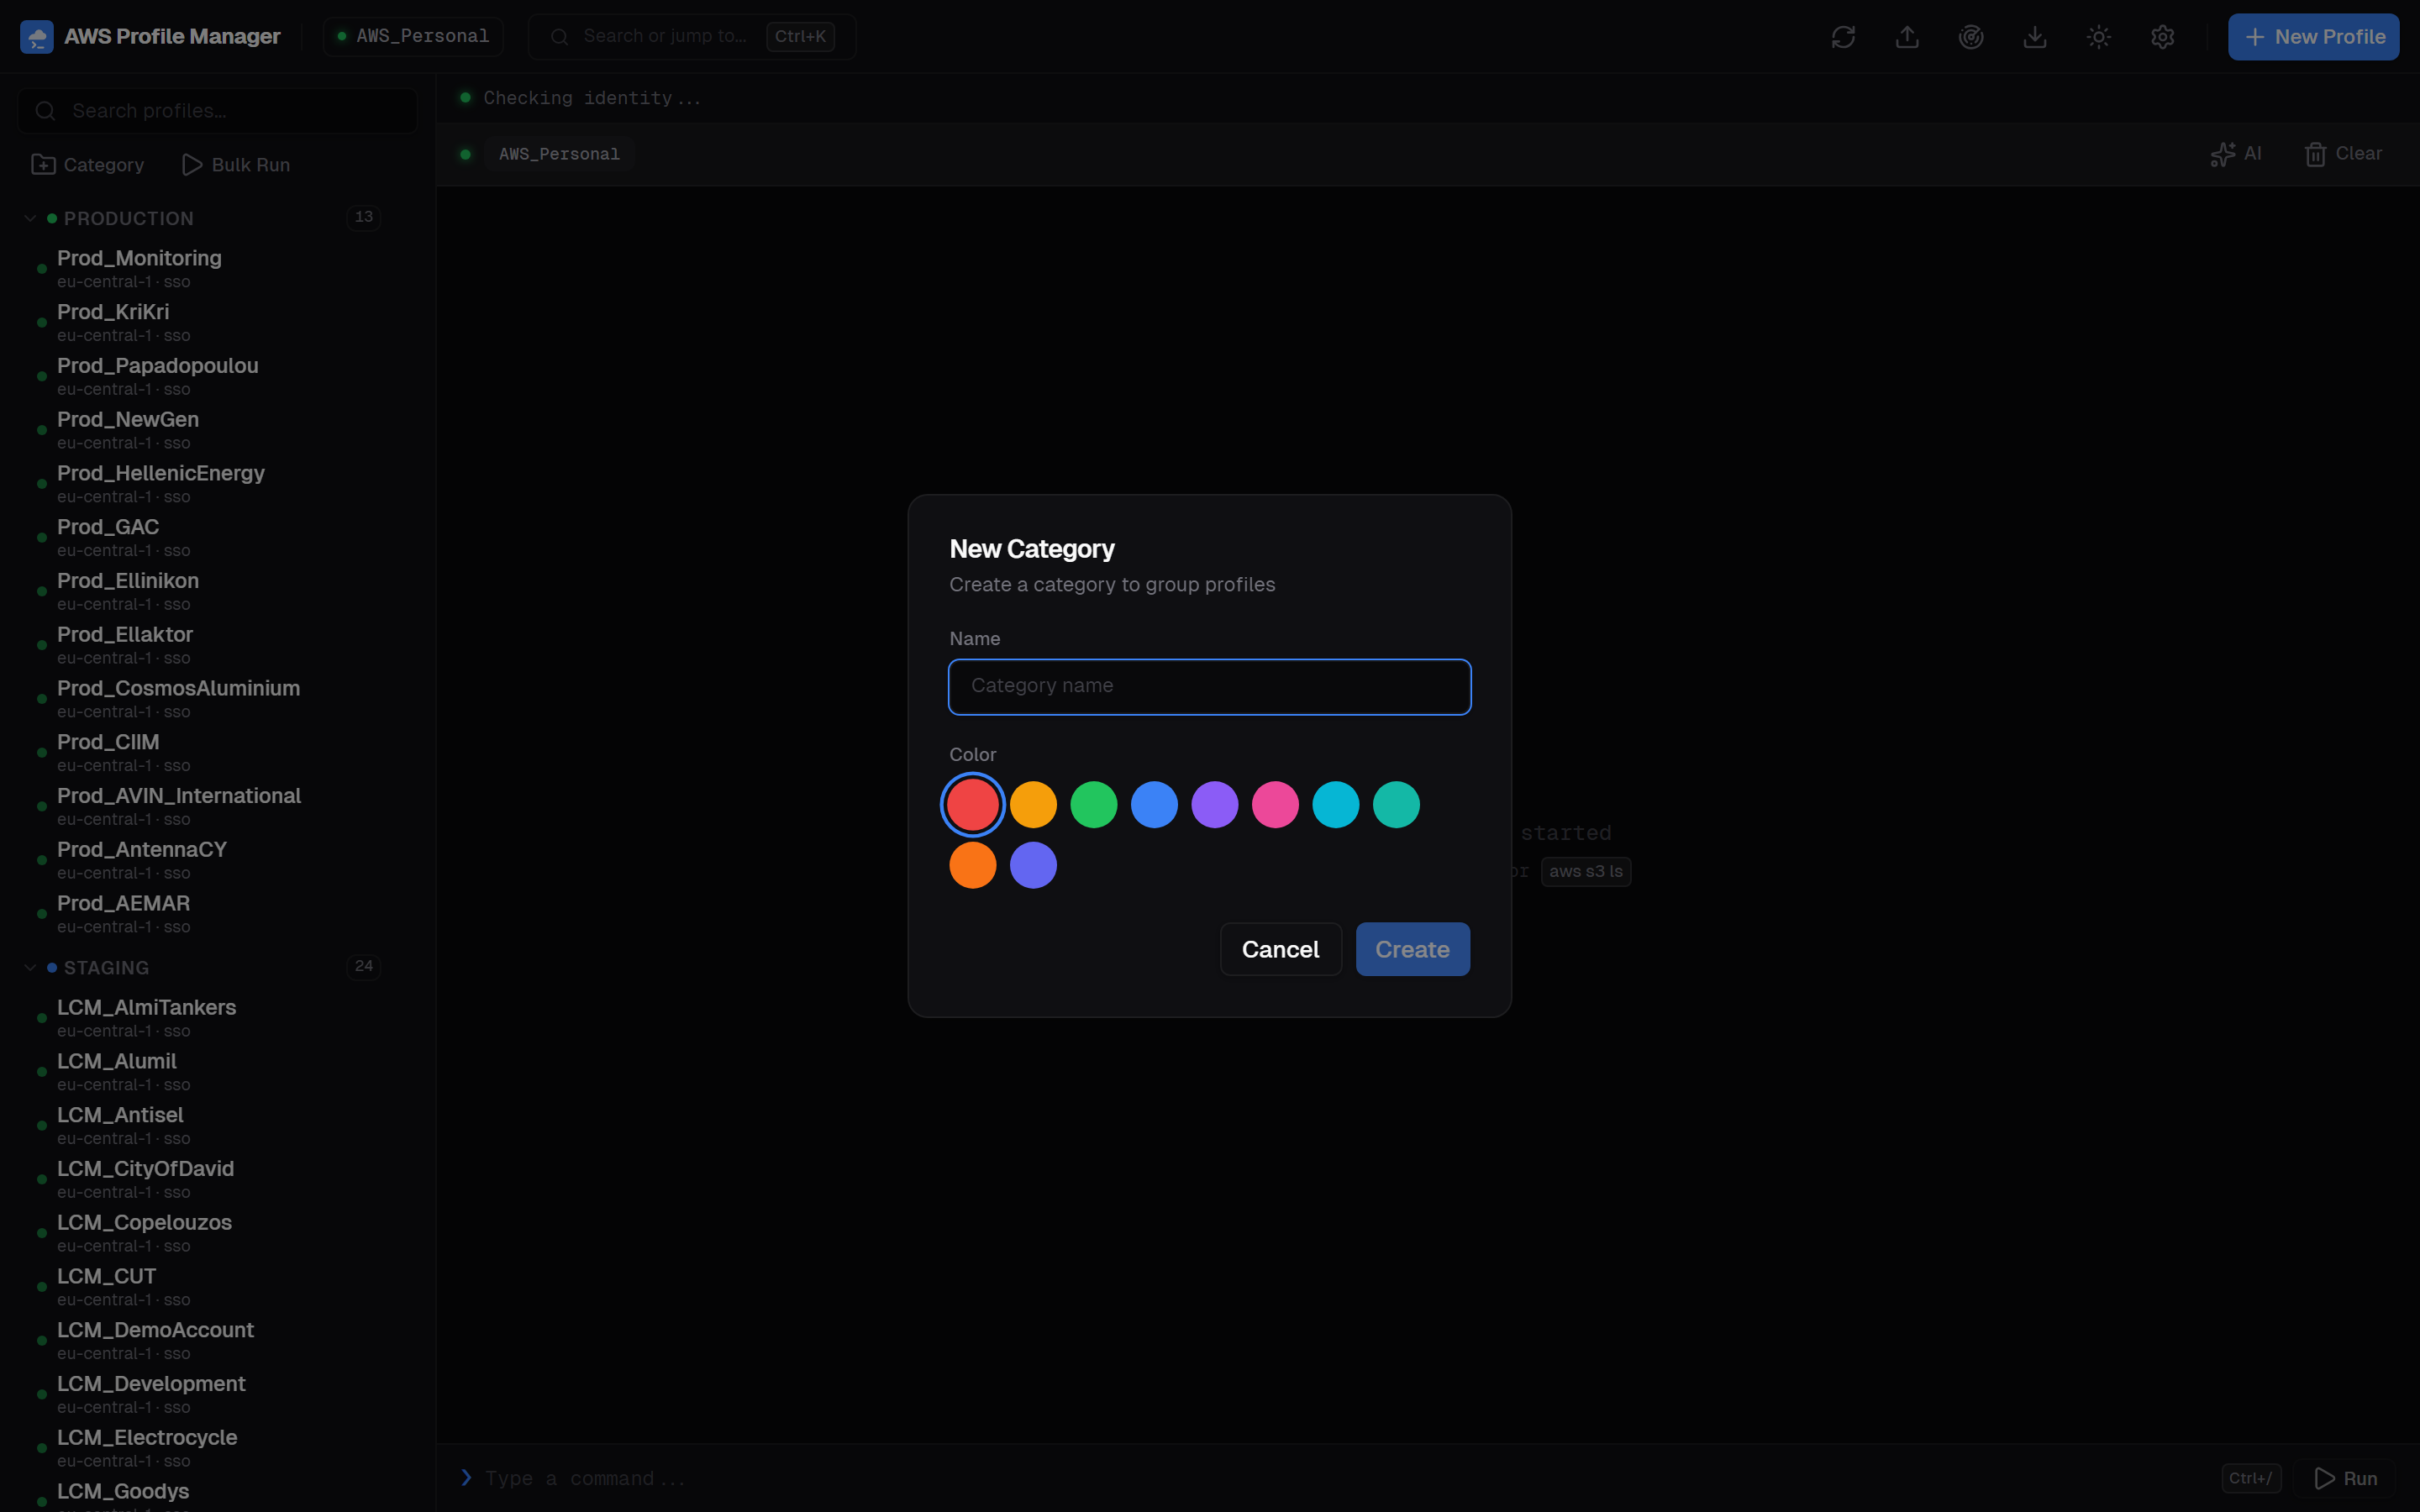
- Create — Click "Category" button or use command palette
- Edit — Click the gear icon on any category header to rename or change color
- Delete — Removes the category but keeps all profiles (moved to uncategorized)
- Collapse/Expand — Click the category header. State is persisted across sessions
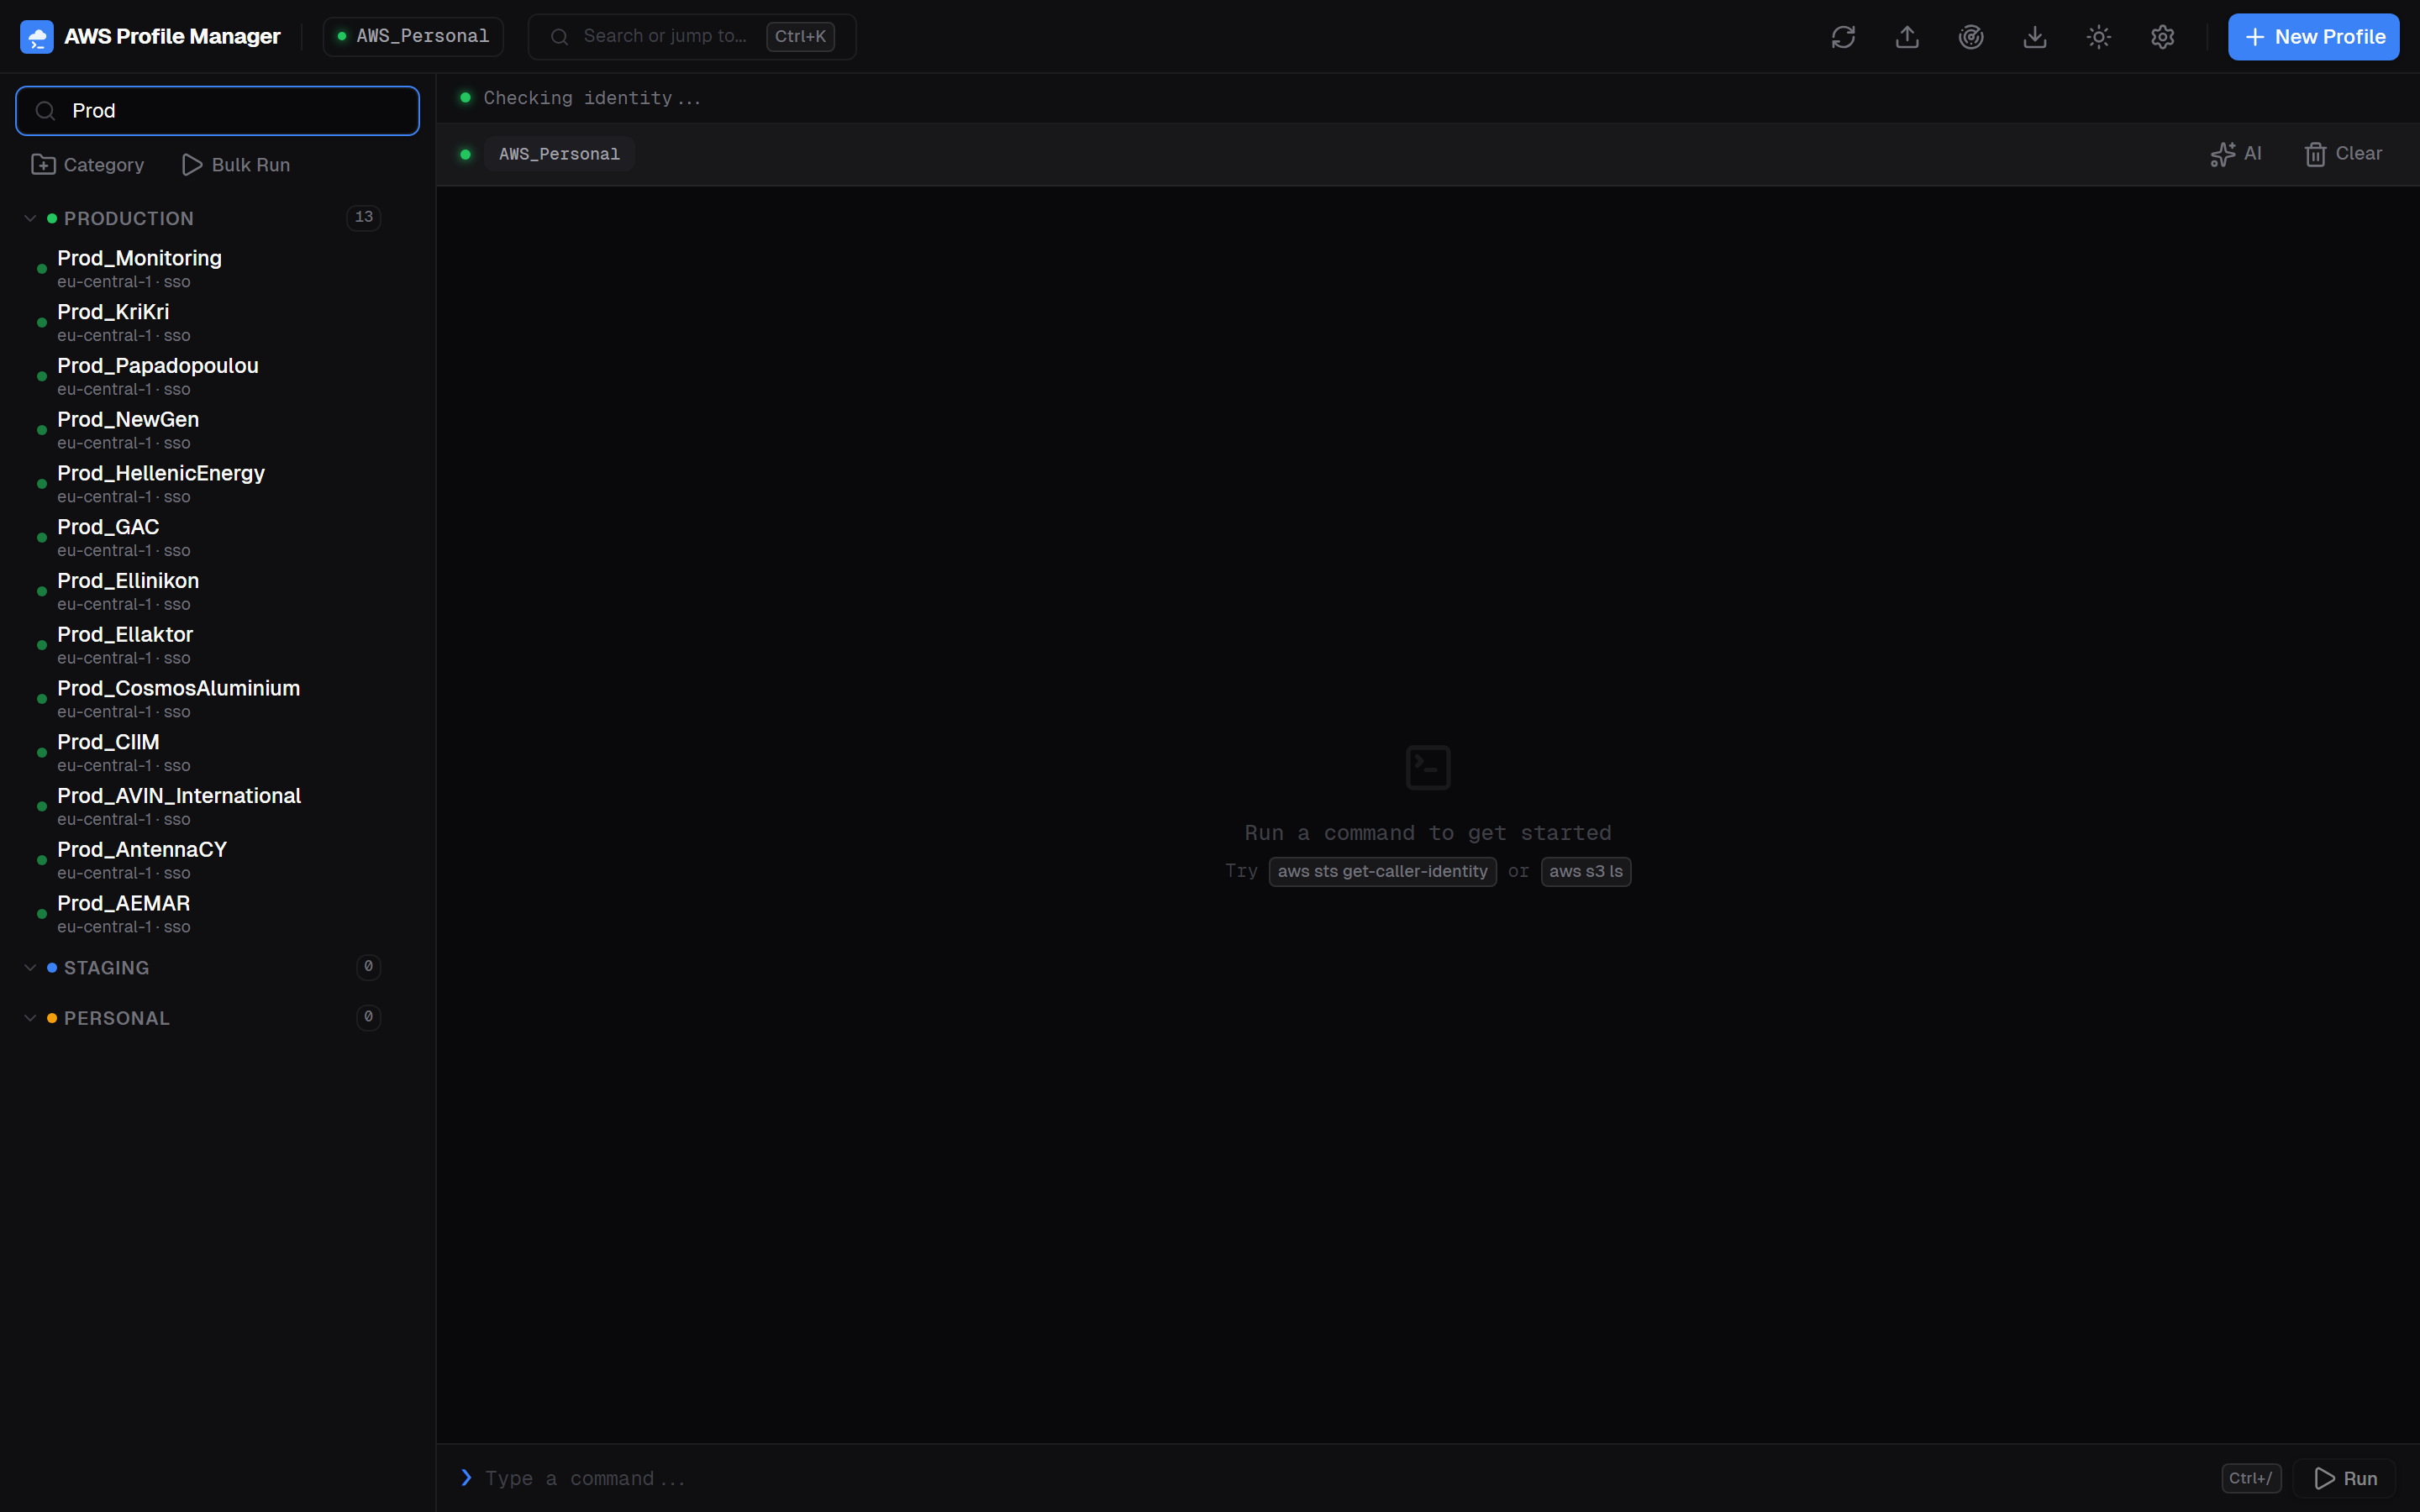
Search & Filter
The search field at the top of the sidebar filters profiles in real-time as you type. It matches against profile name, type, region, and account ID.
Import & Export
Share profile configurations across machines or team members using JSON export/import.
- Export — Command palette (Ctrl+K) → "Export Profiles". Downloads a timestamped JSON file with all profiles and categories.
- Import — Command palette → "Import Profiles". Select a JSON file to restore profiles and category mappings.
Running Commands
The terminal is the core of the application. Type any AWS CLI command and press Enter. The active profile's credentials are injected automatically.
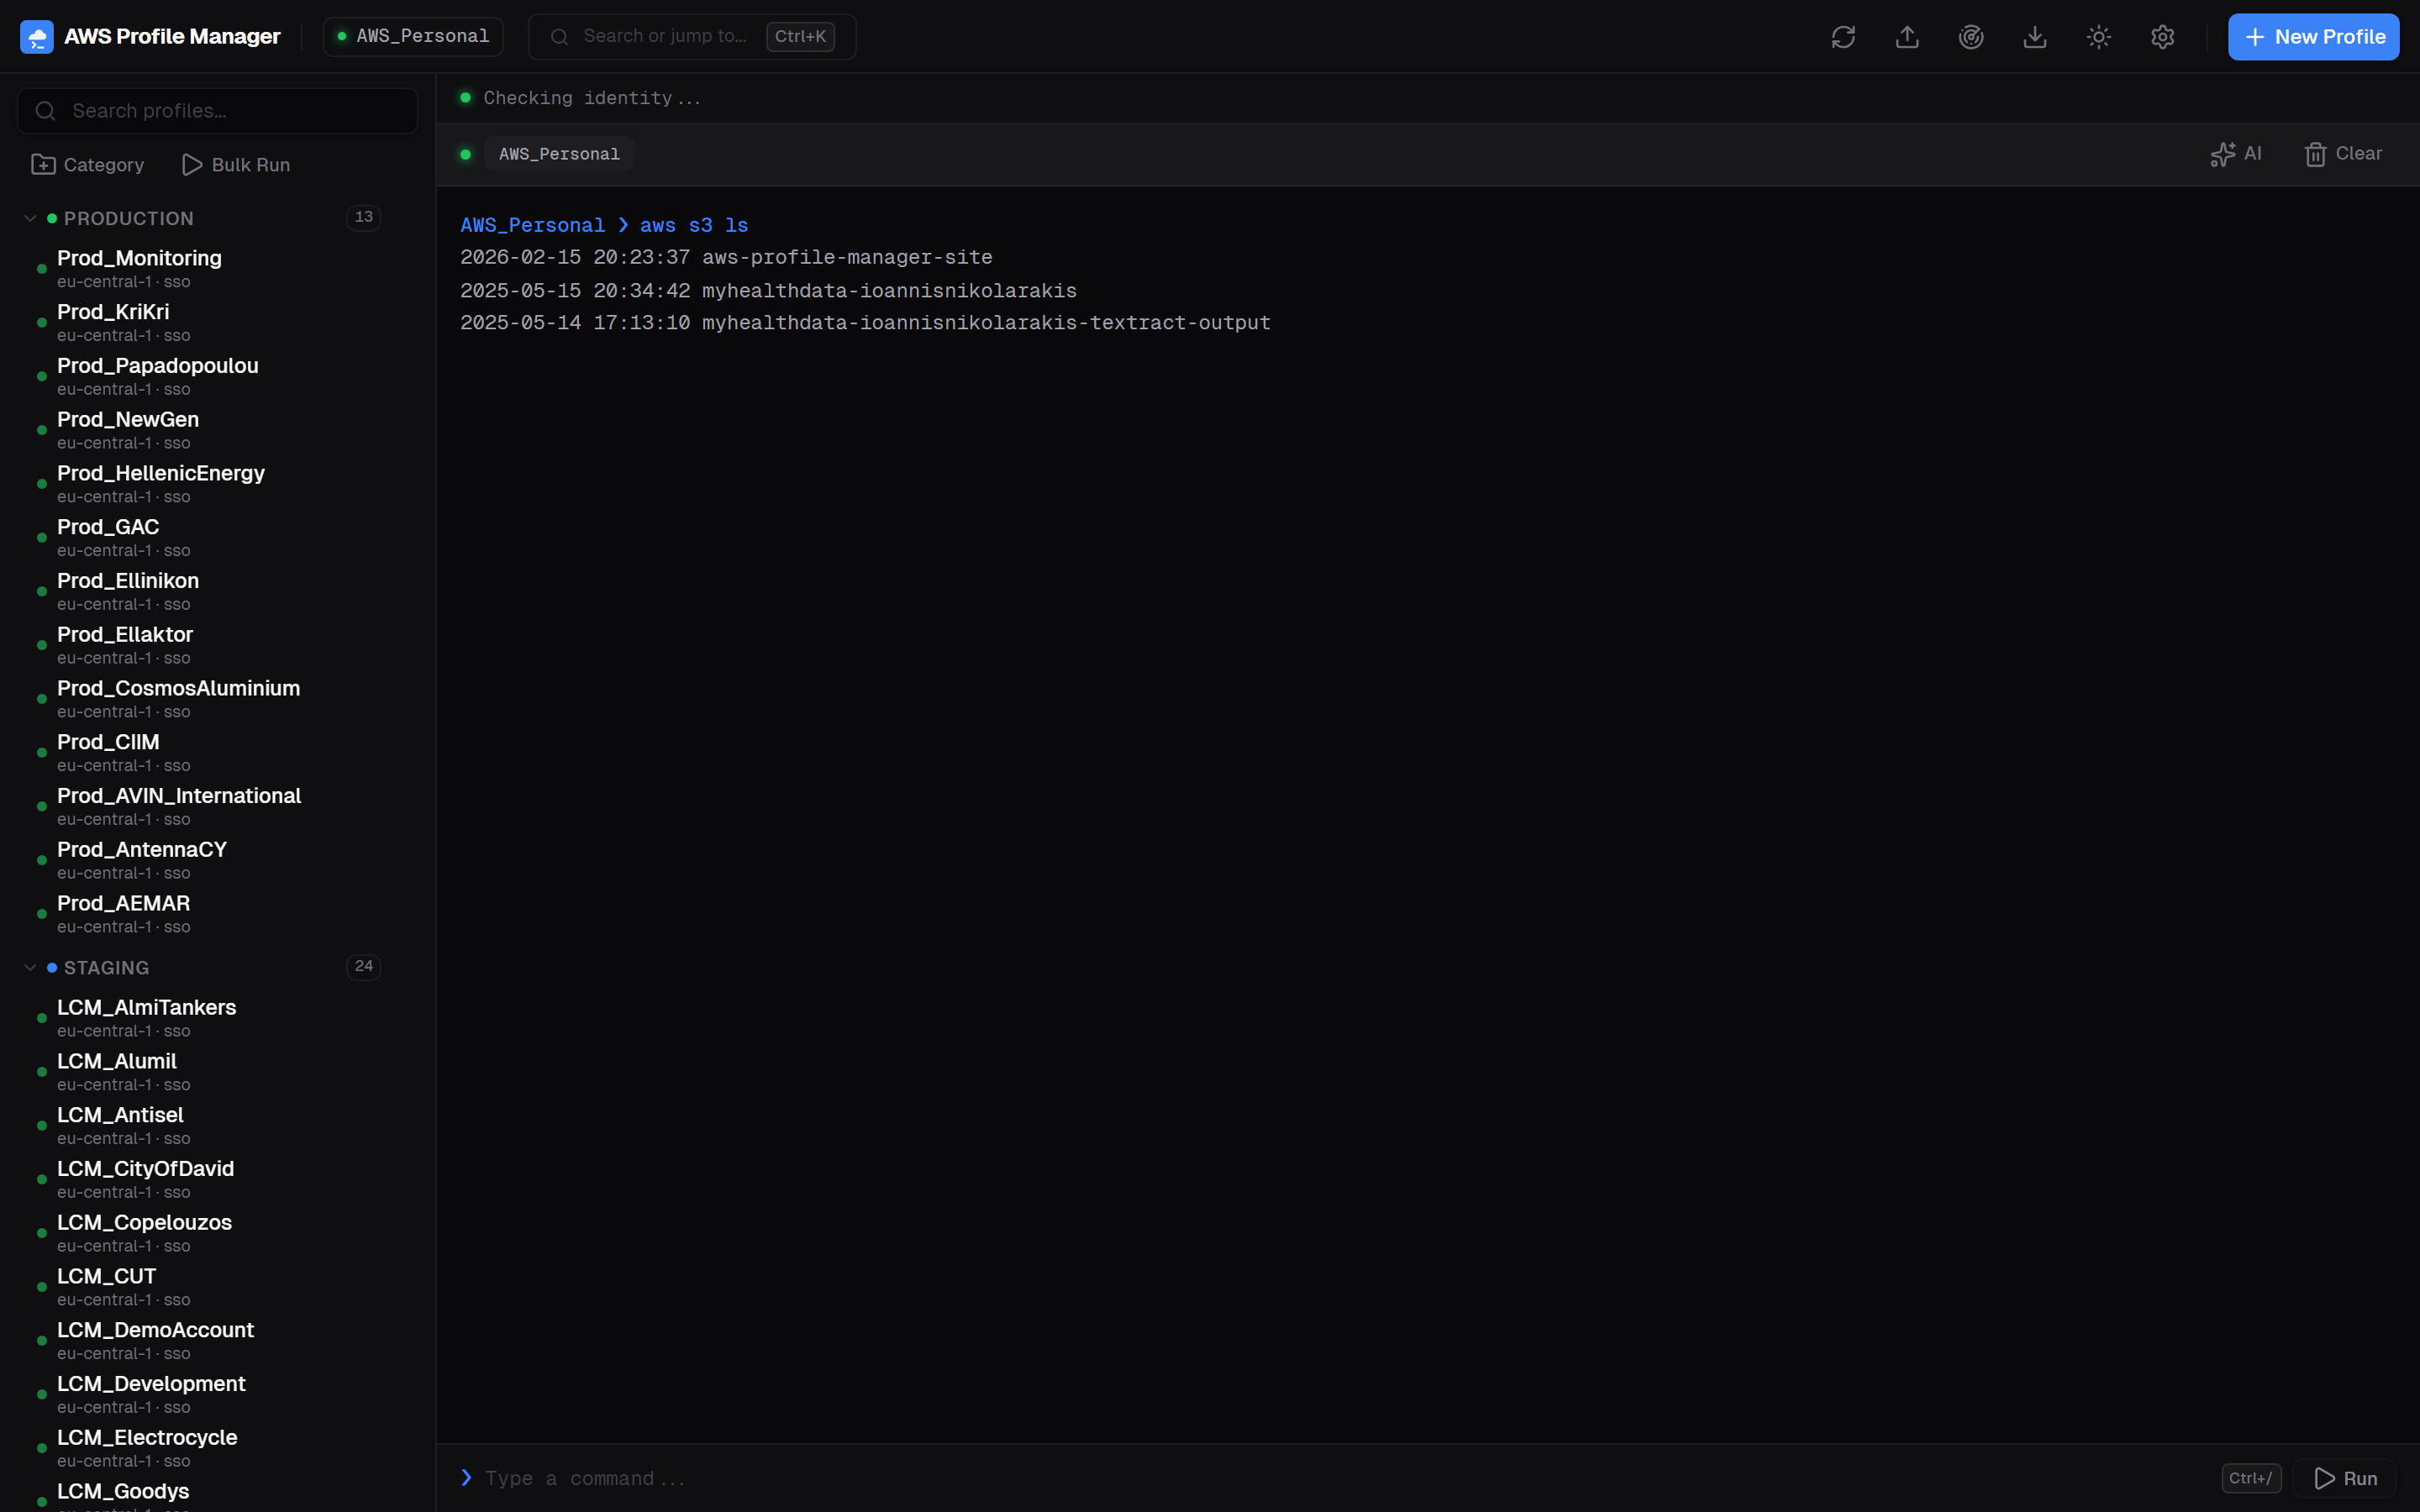
aws s3 ls — output streams in real-time with the active profile's credentials- Profile context — credentials and region are set automatically based on the active profile
- History — use Arrow Up/Down to navigate previous commands
- Streaming output — results appear line-by-line as they're received
- Focus shortcut — press
Ctrl+/to jump to the terminal input from anywhere
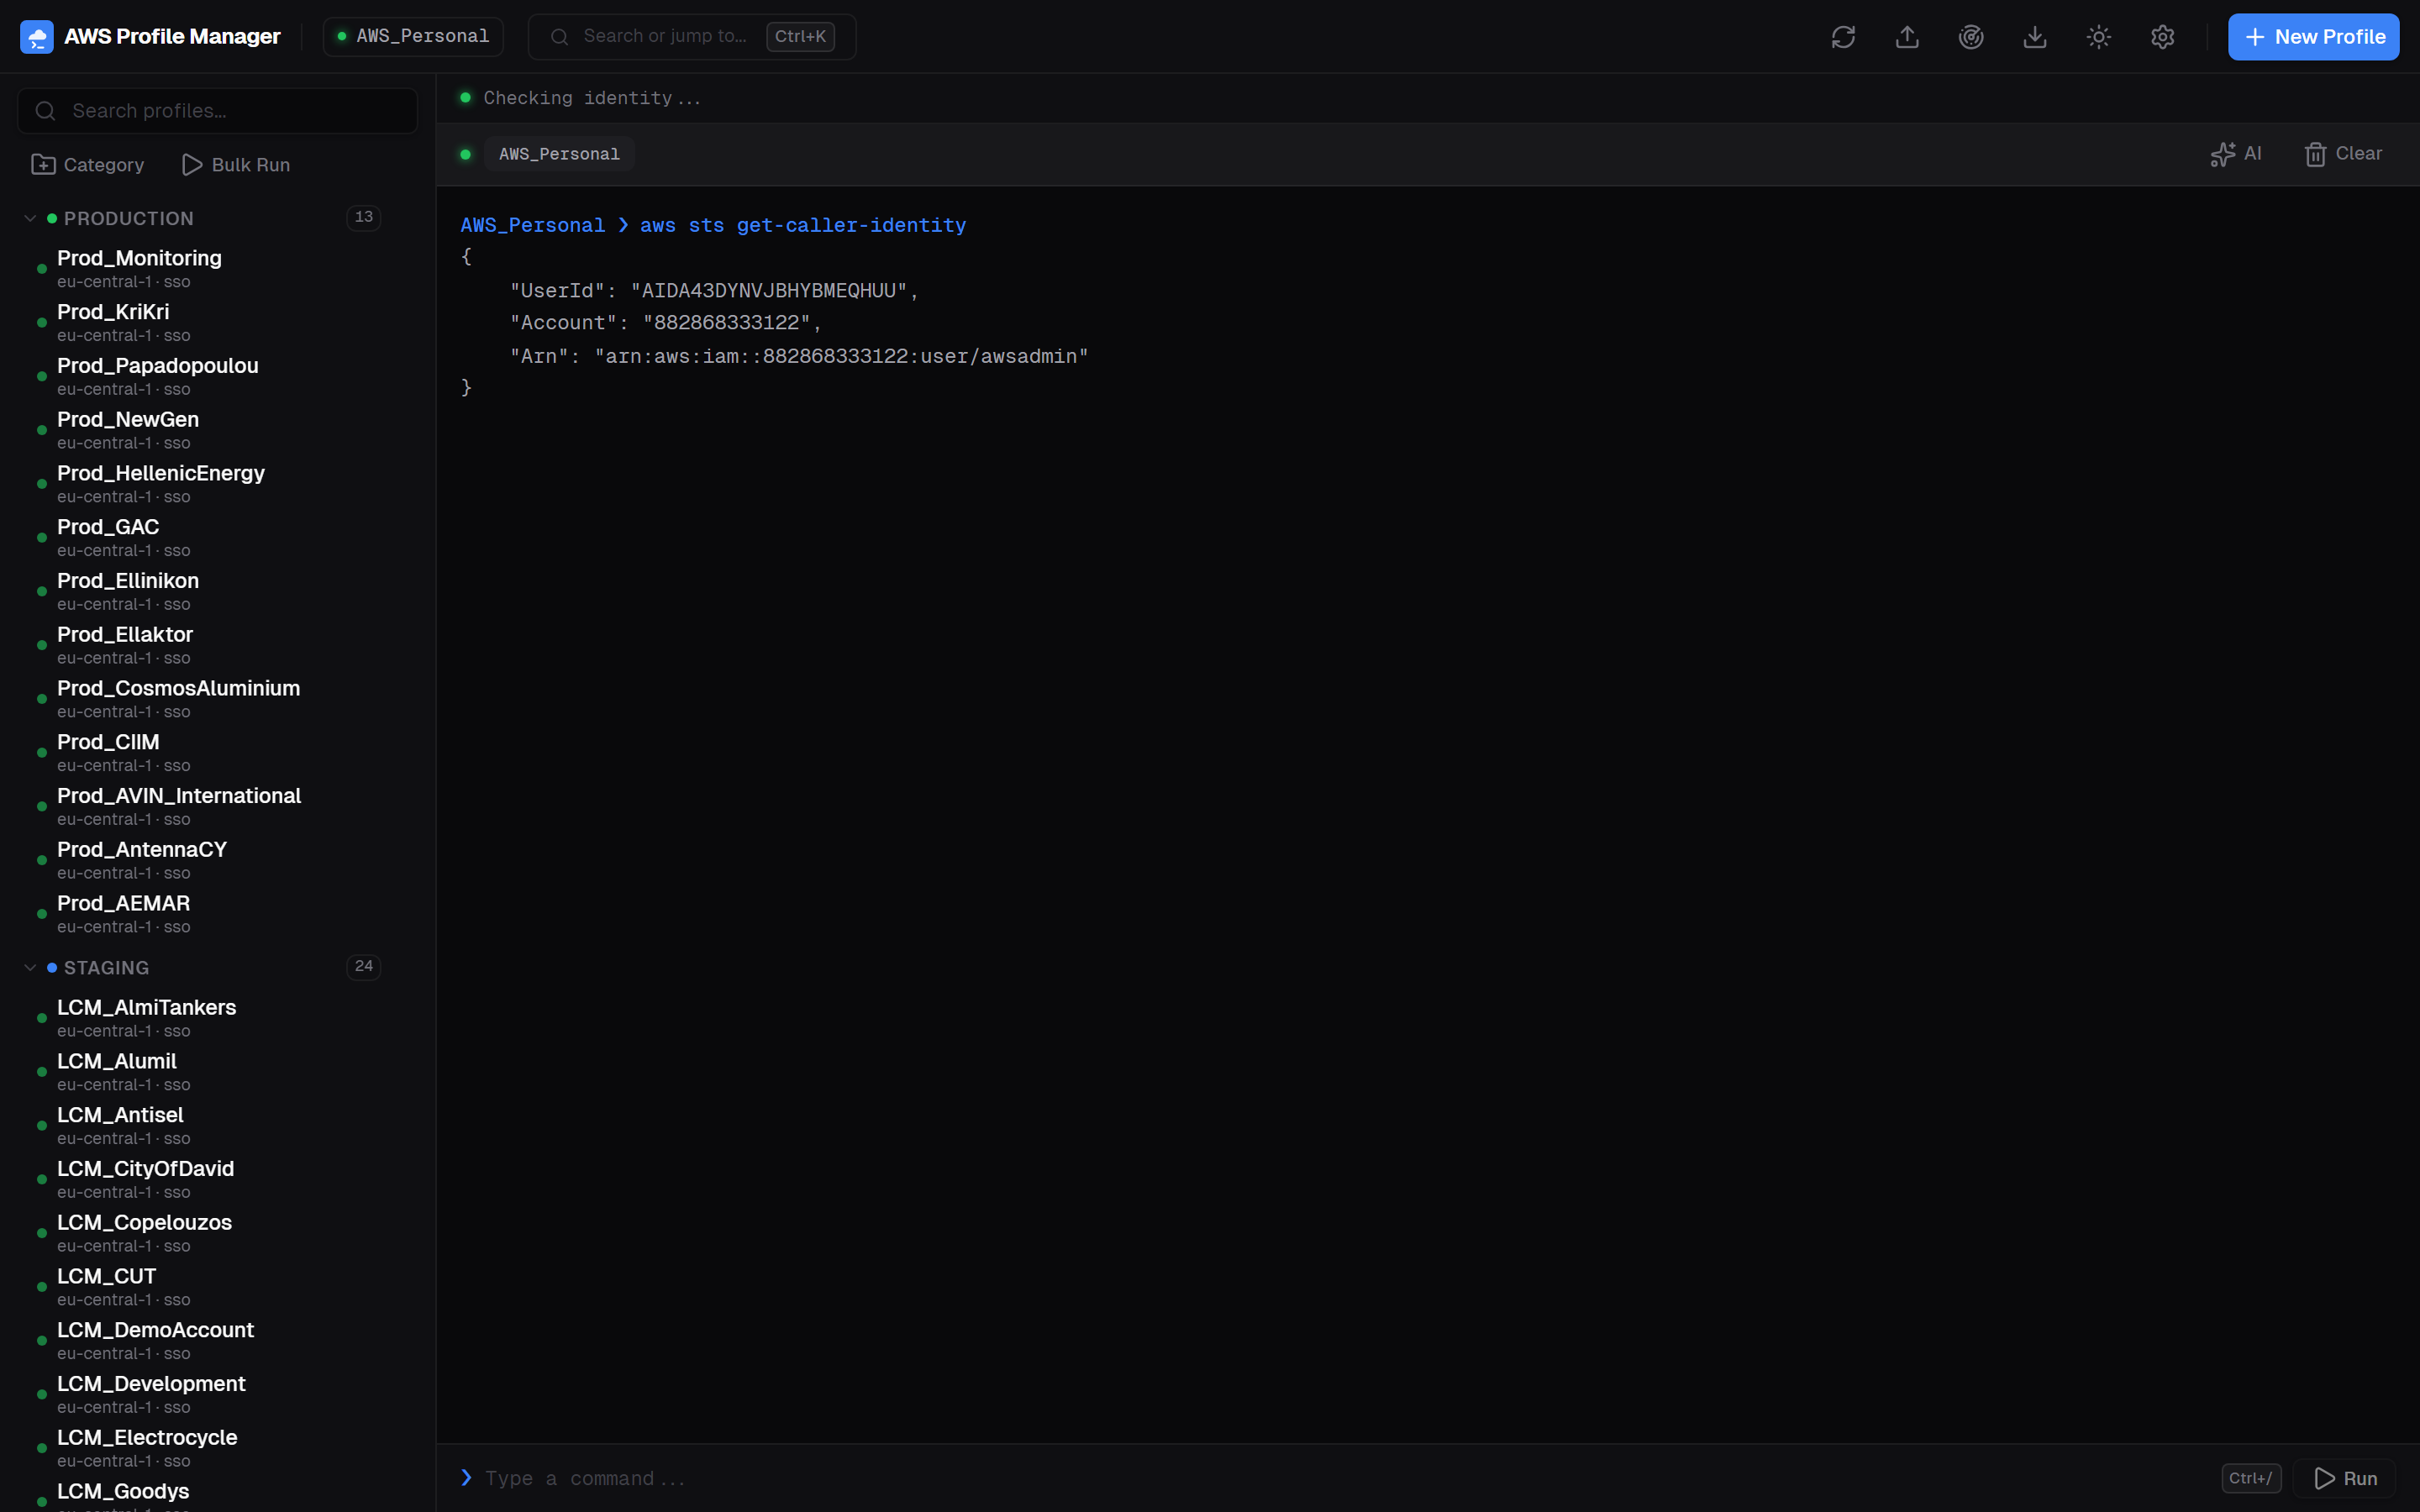
aws sts get-caller-identity — verifies which account and role you're operating asBulk Run
Execute the same command across multiple profiles simultaneously. Click Bulk Run in the sidebar or use the command palette.
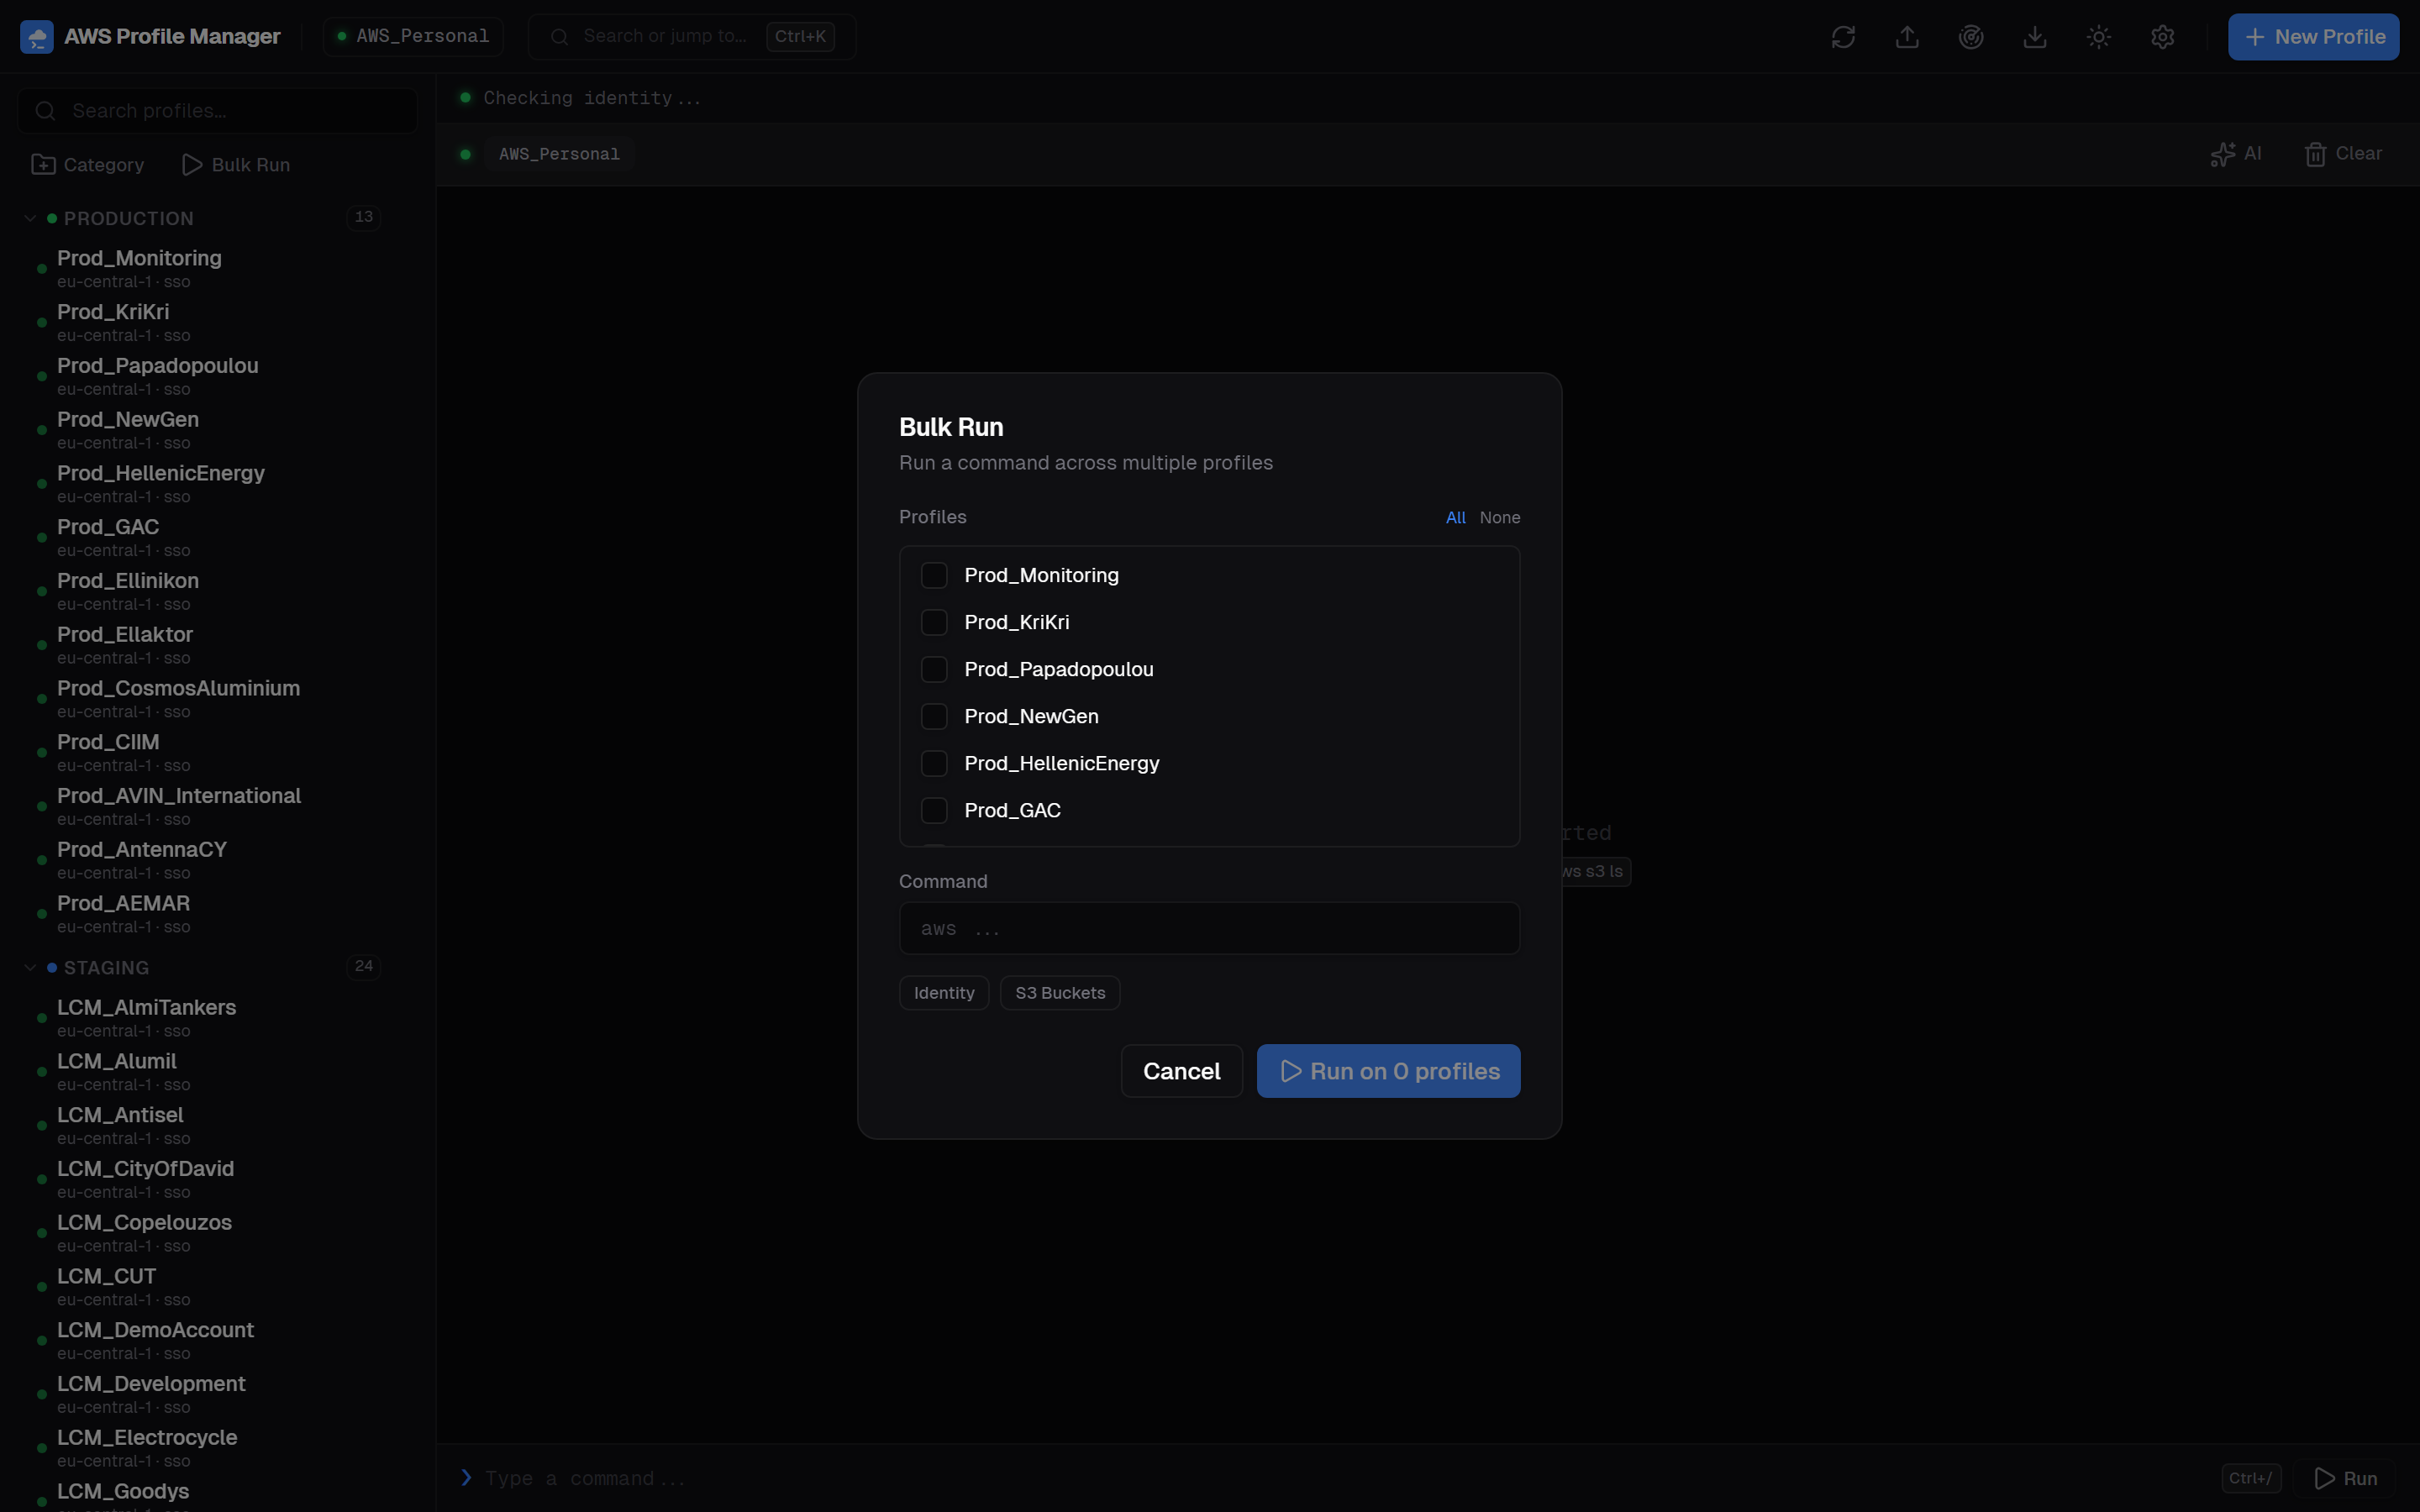
- Select individual profiles or click All to select everything
- Use quick templates: "Identity" runs
aws sts get-caller-identity, "S3 Buckets" runsaws s3 ls - Results are separated by profile name with individual exit codes
- Each command has a 30-second timeout
Terminal Encoding
If terminal output shows garbled characters, adjust the encoding in Settings → General → Terminal Output Encoding.
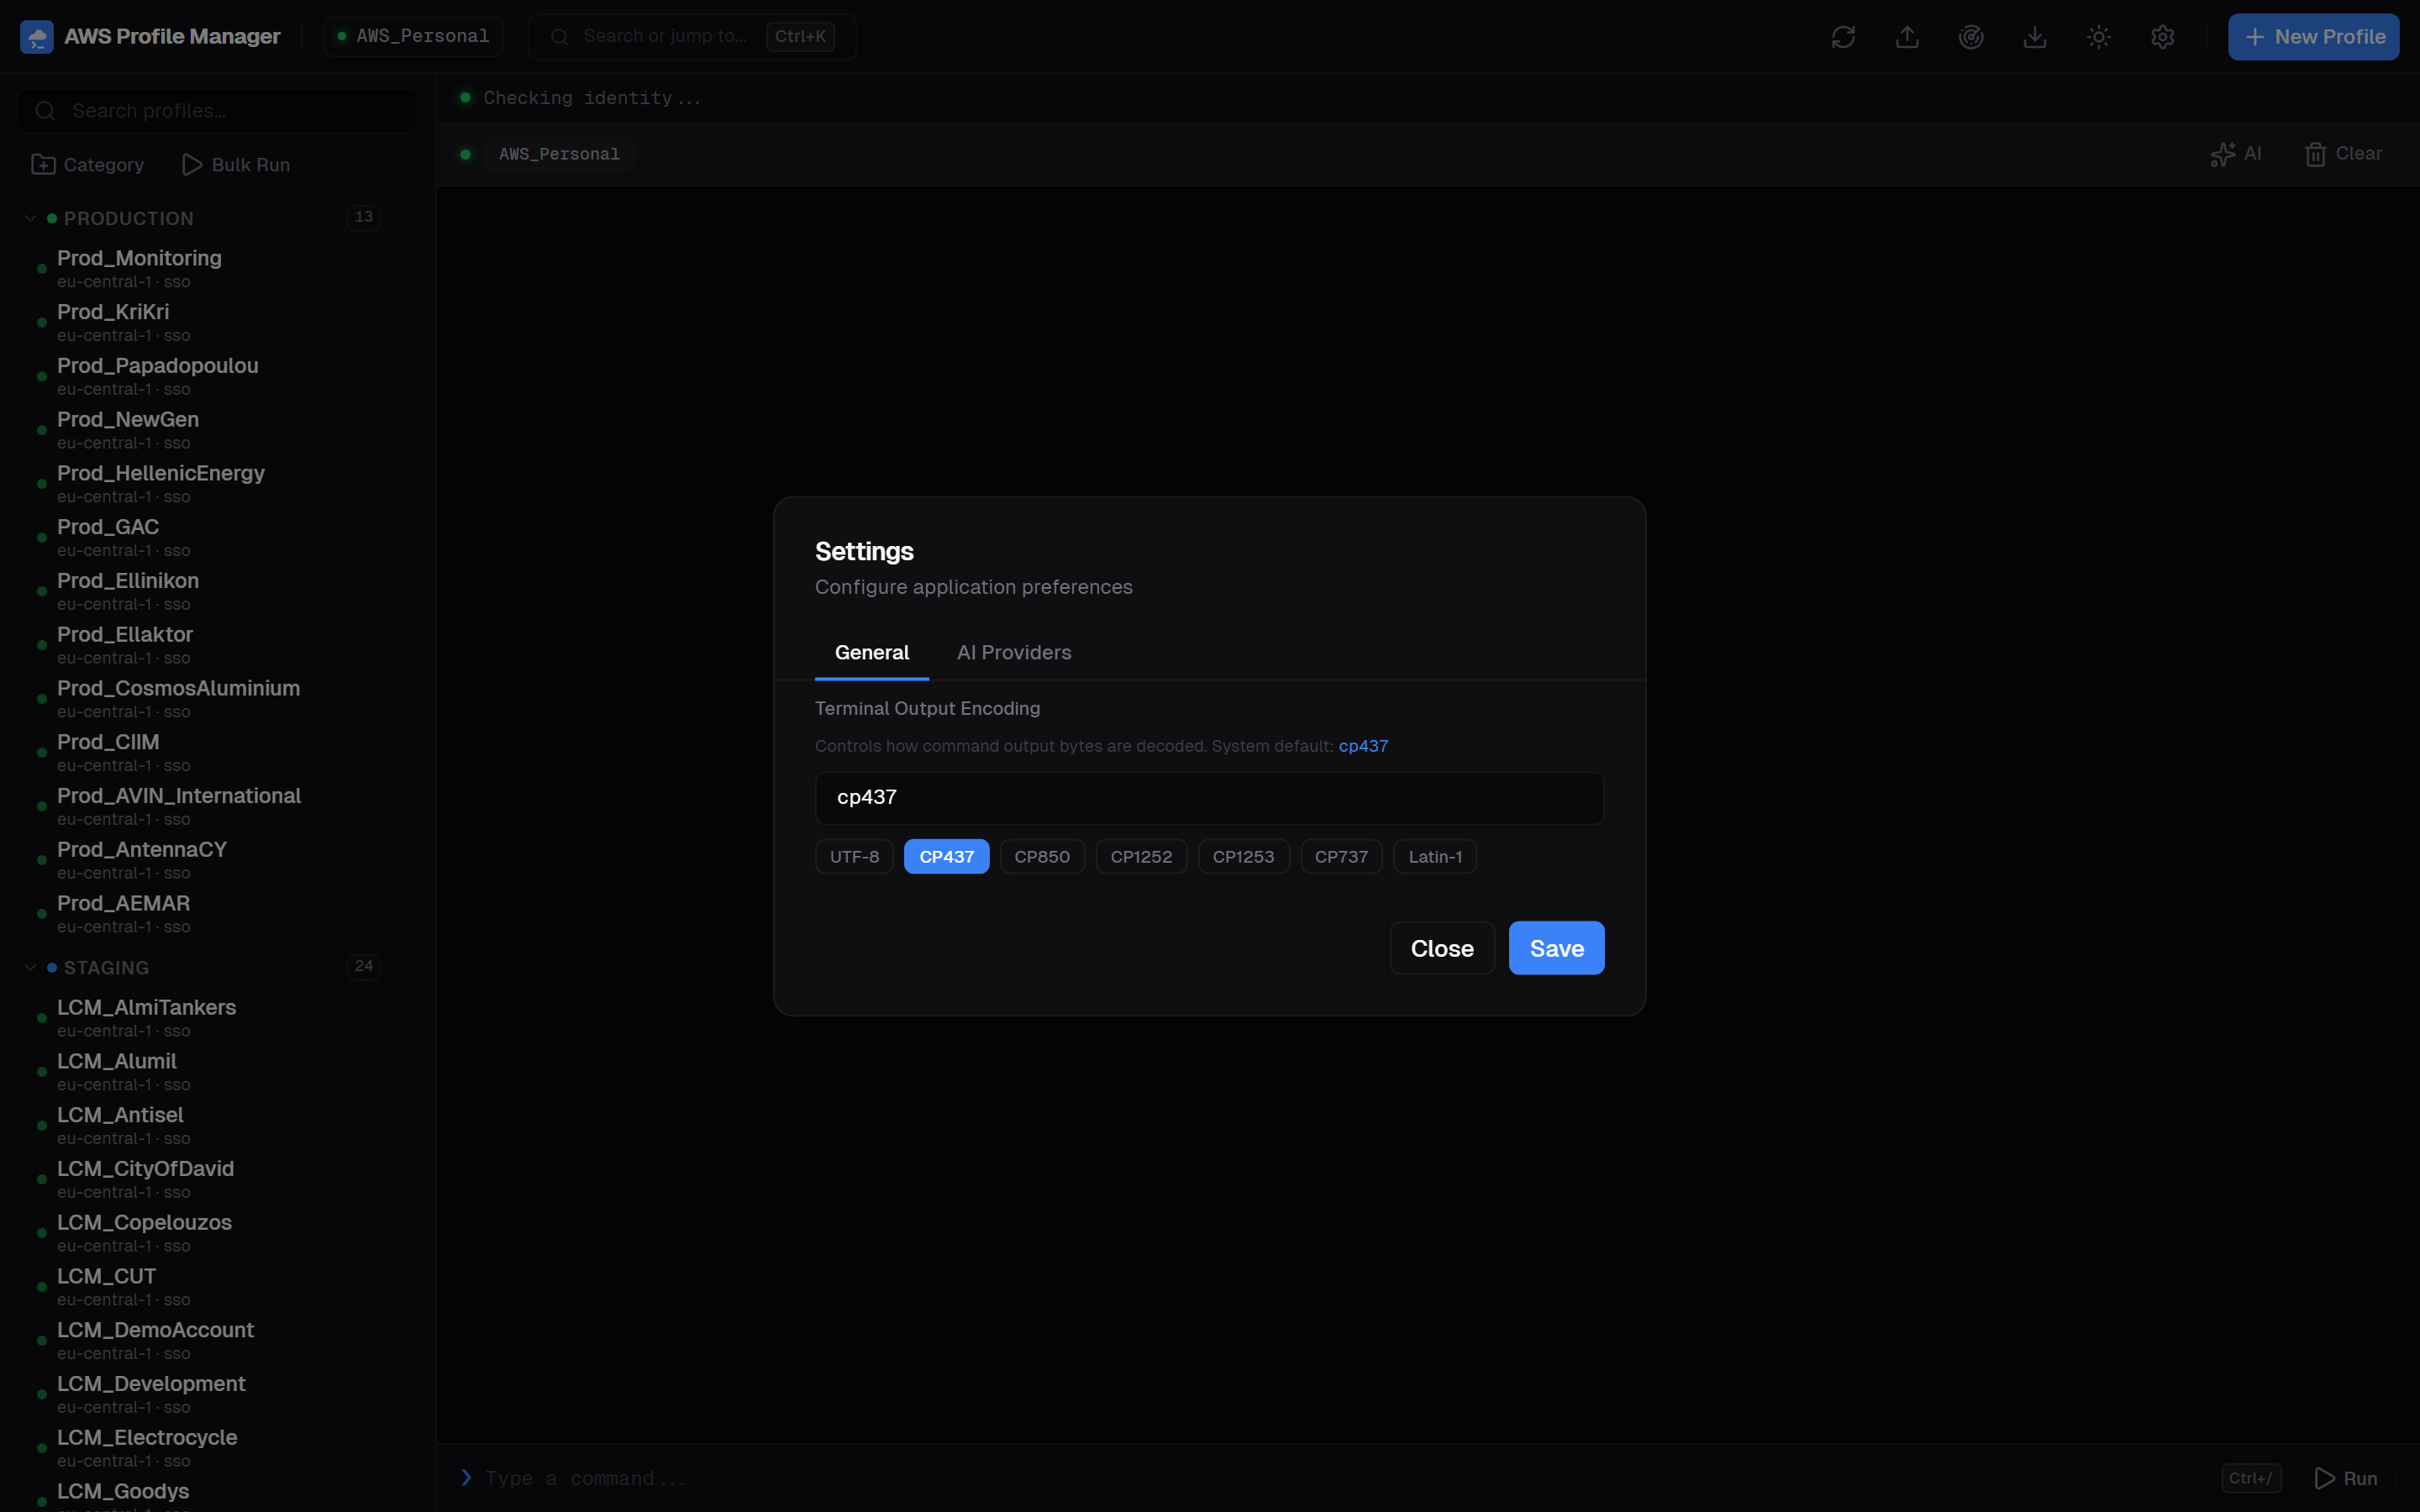
Common encoding options:
| Encoding | When to use |
|---|---|
UTF-8 | macOS, Linux, or modern Windows terminal |
CP437 | Windows Command Prompt (US) |
CP850 | Windows Command Prompt (Western European) |
CP1252 | Windows (Western European legacy apps) |
CP1253 | Windows (Greek) |
AI Integration Overview
AWS Profile Manager integrates with 6 LLM providers to generate AWS CLI commands from natural language descriptions. Toggle AI mode with the AI button in the terminal bar or press Ctrl+I.
AWS Bedrock
Uses your AWS profile credentials. No separate API key needed.
Anthropic
Claude models. Requires an Anthropic API key.
OpenAI
GPT models. Requires an OpenAI API key.
Google AI
Gemini models. Requires a Google AI API key.
OpenRouter
Access multiple models through a single API key.
Ollama
Run models locally. No API key — just a base URL.
Configuring AI Providers
Open Settings (gear icon in header) → AI Providers tab. Select your default provider and configure API keys.
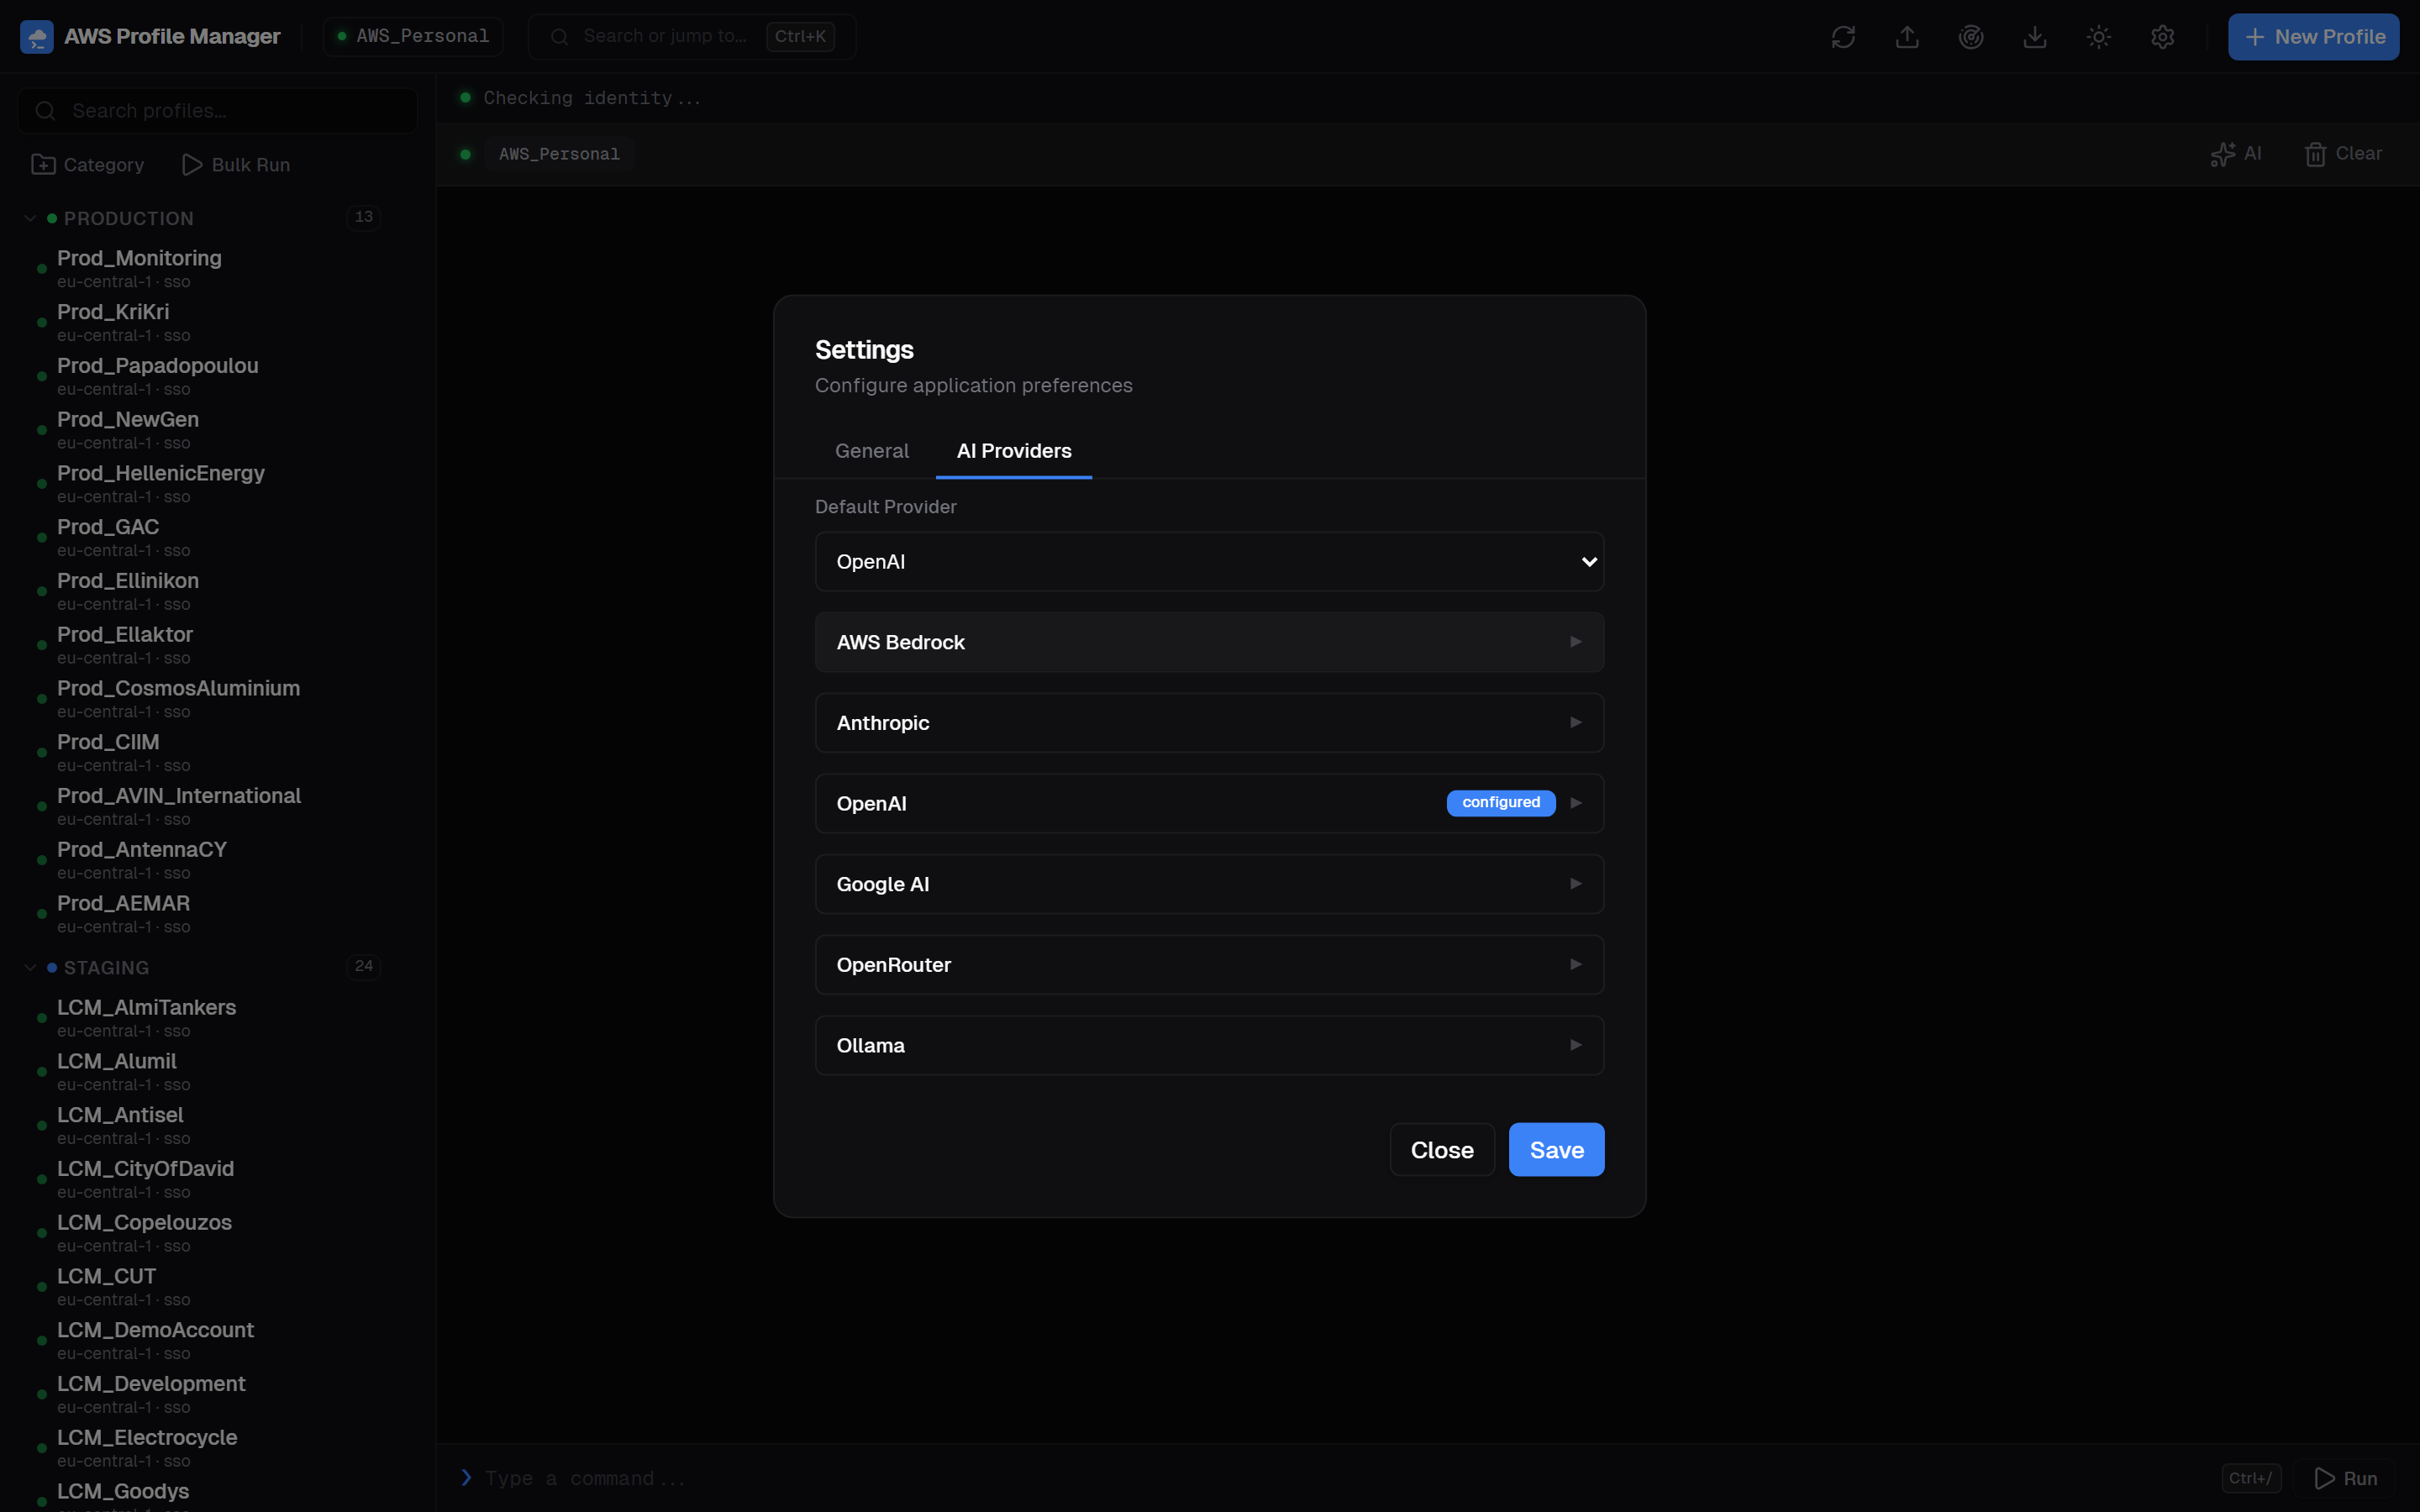
- Choose a Default Provider from the dropdown
- Expand the provider you want to configure
- Enter your API key (stored locally, never transmitted)
- Select a model from the dropdown
- Click Test to verify the connection
- Click Save
~/.aws/profile-manager.json and are never transmitted to any server other than the LLM provider you selected. Keys are masked in the UI after saving.
Generating Commands with AI
With AI mode active, describe what you want in plain English. The AI generates the exact AWS CLI command, context-aware of your active profile and region.
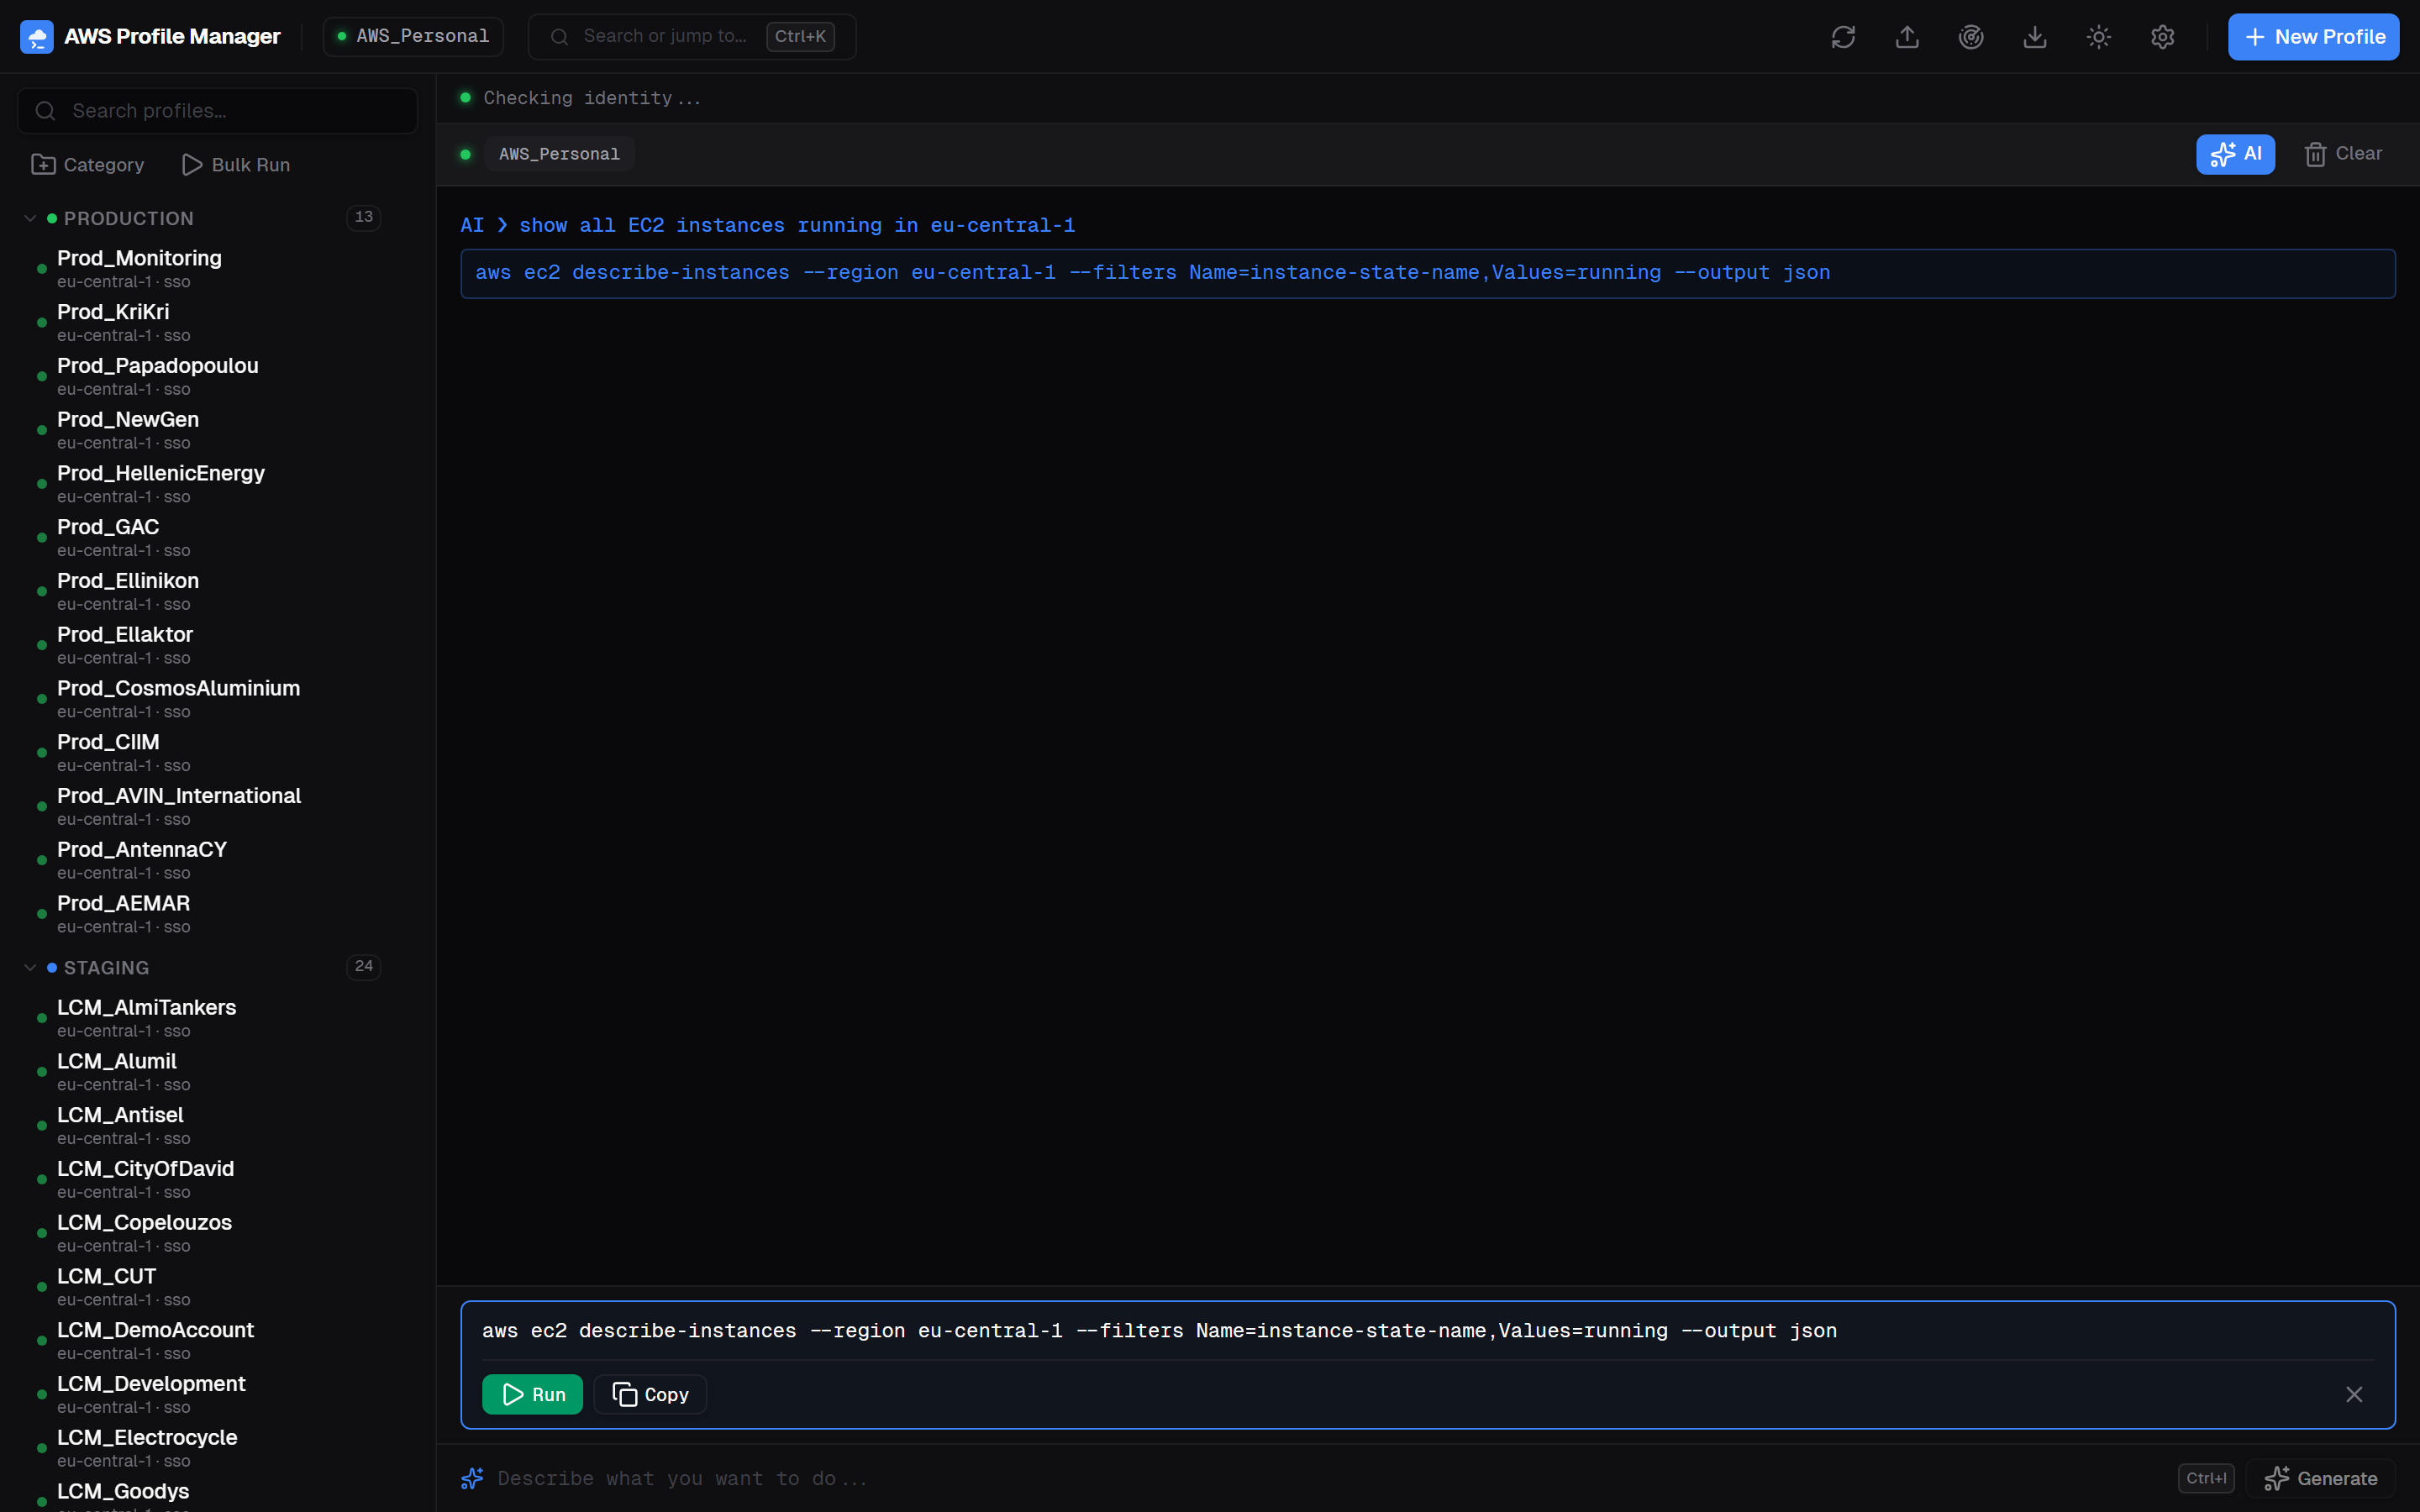
aws ec2 describe-instances from "show all EC2 instances running in eu-central-1" — with Run and Copy buttonsAfter the command is generated:
- Run — execute the command immediately with your active profile
- Copy — copy the command to clipboard
- Dismiss — clear the suggestion (X button)
Example prompts:
| Natural language | Generated command |
|---|---|
| "list all S3 buckets" | aws s3api list-buckets --output json |
| "show running EC2 instances" | aws ec2 describe-instances --filters Name=instance-state-name,Values=running |
| "list all VPCs in Frankfurt" | aws ec2 describe-vpcs --region eu-central-1 --output table |
| "who am I" | aws sts get-caller-identity |
Command Palette
Press Ctrl+K to open the command palette — a quick launcher for switching profiles, running actions, and accessing features.
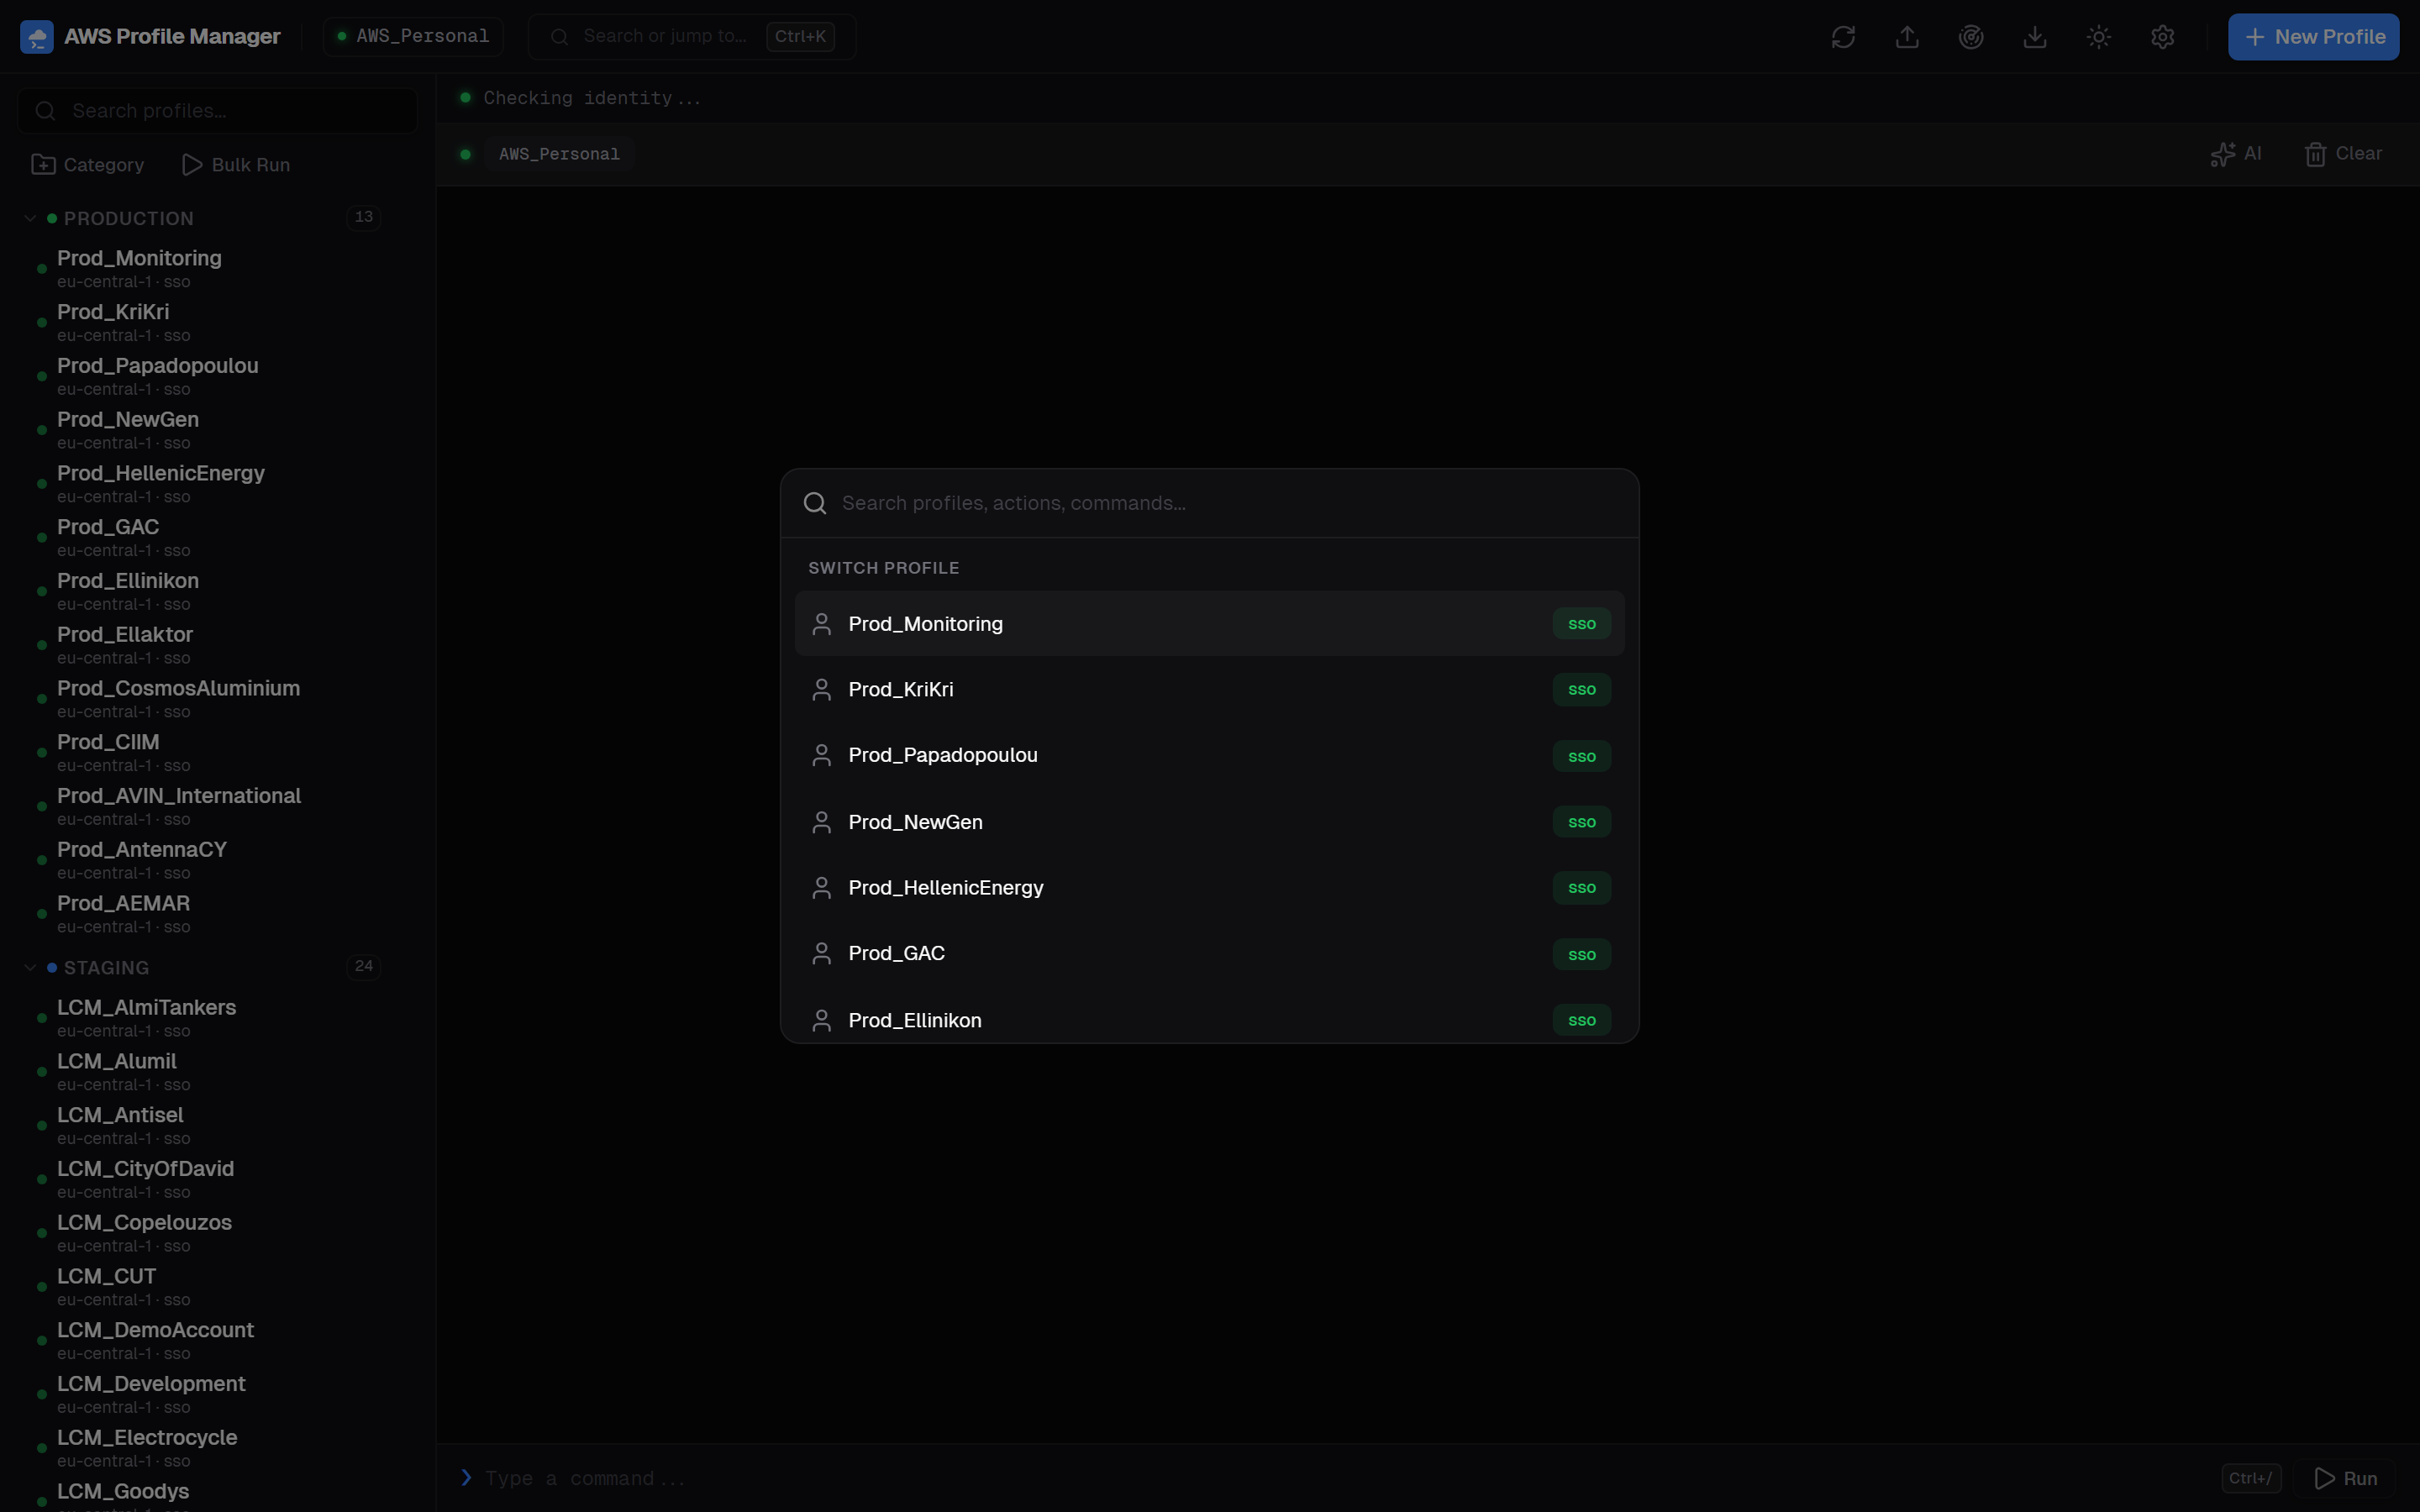
Available actions in the command palette:
- Switch Profile — type a profile name to filter and activate
- New Profile — create a new profile
- Reload Profiles — refresh from AWS config files
- Import / Export Profiles — bulk operations
- Discover SSO Accounts — scan for accounts
- Toggle AI Mode
- Switch Theme (Light / Dark)
- Add Favorite Command
- Open Settings
SSO Account Discovery
If you use AWS IAM Identity Center, the app can automatically discover all accounts and roles you have access to.
- Open the command palette (
Ctrl+K) and select Discover SSO Accounts - The app finds valid SSO tokens in
~/.aws/sso/cache/ - It calls the SSO API to list all accounts and their available roles
- Review the discovered accounts — duplicates are flagged
- Select the accounts you want and click Import
aws sso login --profile <any-sso-profile> in a terminal before discovery.
Cost Explorer
View per-profile AWS spending with a monthly service breakdown. Cost badges appear next to each profile in the sidebar showing the last 30 days of spending.
- Cost badges — appear automatically in the sidebar if the profile has Cost Explorer access
- Detailed breakdown — click the cost badge or use the terminal header to open the Cost Explorer dialog
- Monthly navigation — browse previous months to track spending trends
- Service breakdown — see costs per AWS service with visual bars
ce:GetCostAndUsage IAM permission. The API always runs against us-east-1 regardless of the profile's default region.
Favorites
Save frequently used commands as favorites for one-click access from the header bar.
- Open command palette (
Ctrl+K) → Add Favorite Command - Enter a label (e.g., "Check STS") and the command
- Favorites appear as buttons in the header — click to execute immediately
- Remove favorites via the command palette
Themes
Toggle between dark and light mode using the theme button in the header or via the command palette.
Keyboard Shortcuts
| Shortcut | Action |
|---|---|
Ctrl+K | Open Command Palette |
Ctrl+N | Create New Profile |
Ctrl+I | Toggle AI Mode |
Ctrl+/ | Focus Terminal Input |
Escape | Close active dialog or sheet |
Arrow Up | Previous command in terminal history |
Arrow Down | Next command in terminal history |
Enter | Execute command in terminal |
Configuration Files
AWS Profile Manager reads and writes the standard AWS CLI configuration files plus its own state file:
| File | Purpose |
|---|---|
~/.aws/config | Profile definitions (INI format). Sections use [profile name] prefix (except [default]). |
~/.aws/credentials | Access keys for credential-type profiles. Sections use [name] (no "profile" prefix). |
~/.aws/profile-manager.json | App state: categories, favorites, theme, collapsed state, LLM config, terminal encoding. |
~/.aws/sso/cache/ | SSO session token cache (managed by AWS CLI). |
~/.aws/config.backup.20260215_143022).
profile-manager.json Structure
{
  "categories": {
    "cat_id": { "name": "Production", "color": "#22c55e", "order": 0 }
  },
  "profile_cat": {
    "Prod_Monitoring": "cat_id"
  },
  "favorites": [
    { "label": "Check STS", "cmd": "aws sts get-caller-identity" }
  ],
  "theme": "dark",
  "collapsed": { "cat_id": false },
  "terminal_encoding": "cp437",
  "llm_config": {
    "default_provider": "openai",
    "providers": {
      "openai": { "api_key": "sk-...", "model": "gpt-4o" }
    }
  }
}
Troubleshooting
App won't start
- Ensure Python 3.10+ is installed:
python --version - Ensure Node.js 18+ is installed:
node --version - Run
make setupto reinstall dependencies - Check if port 8099 is already in use
SSO profiles show "expired"
- Run
aws sso login --profile <profile-name>in an external terminal - Check that your SSO start URL is correct in the profile config
- SSO sessions typically expire after 8-12 hours
Terminal output shows garbled characters
- Open Settings → General → Terminal Output Encoding
- Try
UTF-8first, thenCP437(Windows US), orCP1252(Windows EU)
AI commands not generating
- Verify your API key in Settings → AI Providers
- Click Test next to the provider to check connectivity
- For Ollama, ensure the local server is running and the base URL is correct
- For Bedrock, ensure the active profile has
bedrock:InvokeModelpermissions
Cost badges not appearing
- The profile needs
ce:GetCostAndUsageIAM permission - New AWS accounts may not have Cost Explorer enabled — activate it in the AWS Console first
- Cost data can take up to 24 hours to appear for new accounts
Commands fail with "aws not found"
- Install the AWS CLI v2: AWS CLI Installation Guide
- Ensure
awsis in your system PATH - Restart the app after installing AWS CLI